Пример настройки доступа к локальной сети клиента anyconnect и клиента vpn
Содержание:
- Introduction
- Настройка доступа к локальной сети для VPN-клиентов или клиента AnyConnect Secure Mobility Client
- Editing the registry
- Загрузка дистрибутива Cisco VPN Client
- Licensing Requirements for the FIPS-Compliant VPN Client
- Скулы
- Настройка
- Похожие приложения
- Resolved Caveats
- How the VPN 3000 Concentrator Uses User and Group Attributes
- Troubleshooting and post-installation
- Prerequisites
- Прогресс отправки
- Configure
- Install AnyConnect Secure Mobility Client
- Verify
- Поймите, какая у вашего письма цель
- Аналогия: каждая ЛВС как остров
- python — как удалить строку из csv, если она содержит определенное слово?
- Introduction
- Что это за программа?
- Как пользоваться
Introduction
This document describes how to allow the Cisco VPN Client or the Cisco AnyConnect Secure Mobility Client to only access their local LAN while tunneled into a Cisco Adaptive Security Appliance (ASA) 5500 Series or the ASA 5500-X Series. This configuration allows Cisco VPN Clients or the Cisco AnyConnect Secure Mobility Client secure access to corporate resources via IPsec, Secure Sockets Layer (SSL), or Internet Key Exchange Version 2 (IKEv2) and still gives the client the ability to carry out activities such as printing where the client is located. If it is permitted, traffic destined for the Internet is still tunneled to the ASA.
Note: This is not a configuration for split tunneling, where the client has unencrypted access to the Internet while connected to the ASA or PIX. Refer to PIX/ASA 7.x: Allow Split Tunneling for VPN Clients on the ASA Configuration Example for information on how to configure split tunneling on the ASA.
Настройка доступа к локальной сети для VPN-клиентов или клиента AnyConnect Secure Mobility Client
Выполните следующие действия, чтобы разрешить клиентам Cisco VPN или Cisco AnyConnect Secure Mobility доступ к их локальной сети при наличии подключения к устройству ASA:
- или
Настройка ASA через ASDM
Выполните следующие действия в ASDM, чтобы разрешить клиентам VPN доступ к локальной сети при наличии подключения к устройству ASA:
- Выберите Configuration> Remote Access VPN> Network (Client) Access> Group Policy (Конфигурация > VPN для удаленного доступа > Доступ к сети (клиент) > Групповая политика) и выберите групповую политику, в которой следует включить доступ к локальной сети. Затем нажмите Edit (Редактировать).
- Перейдите в меню Advanced > Split Tunneling (Дополнительно > Разделенное туннелирование).
- Снимите флажок Inherit (Наследовать) для политики и выберите Exclude Network List Below (Исключить список сетей ниже).
- Снимите флажок Inherit (Наследовать) для списка сетей и затем нажмите Manage (Управление), чтобы запустить диспетчер списков контроля доступа (ACL Manager).
- В приложении ACL Manager, последовательно выберите Add > Add ACL…, чтобы создать новый список доступа.
- Укажите имя ACL и нажмите кнопку OK.
- После создания списка ACL выберите Добавить > Добавить ACE…, чтобы добавить элемент контроля доступа (ACE).
- Определите элемент контроля доступа, соответствующий локальной сети клиента.
- Выберите Permit (Разрешить).
- Выберите IP-адрес 0.0.0.0
- Выберите маску подсети /32.
- Введите описание (необязательно).
- Нажмите кнопку ОК.
- Нажмите кнопку OK, чтобы завершить работу с приложением ACL Manager.
- Убедитесь, что только что созданный список контроля доступа выбран для списка сетей разделенных туннелей.
- Нажмите кнопку OK, чтобы вернуться к настройке групповой политики.
- Нажмите кнопку Apply и затем (если потребуется) Send, чтобы отправить эти команды в модуль ASA.
Настройка ASA через интерфейс командной строки
Разрешить VPN-клиентам доступ к локальной сети при наличии подключения к ASA можно не только при помощи ASDM, но и посредством интерфейса командной строки устройства ASA:
Переход в режим конфигурирования.ciscoasa>enablePassword:ciscoasa#configure terminalciscoasa(config)#
Создайте список контроля доступа, чтобы разрешить доступ к локальной сети.ciscoasa(config)#access-list Local_LAN_Access remark Client Local LAN Accessciscoasa(config)#access-list Local_LAN_Access standard permit host 0.0.0.0
Внимание. : Из-за различий в синтаксисе списка контроля доступа в версиях 8.x и 9.x программного обеспечения ASA этот список контроля доступа стал некорректным, и администраторы будут получать следующее сообщение об ошибке при попытке его настройки:rtpvpnoutbound6(config)# access-list test standard permit host 0.0.0.0Ошибка: недопустимый IP-адресМожно использовать только следующую команду:rtpvpnoutbound6(config)# access-list test standard permit any4 Это известная неполадка, для обхода которой был создан идентификатор ошибки Cisco CSCut3131. Выполните обновление до версии, в которой исправлена эта ошибка, чтобы иметь возможность настроить доступ к локальной сети. Перейдите в режим настройки для групповой политики, которую необходимо изменить.ciscoasa(config)#group-policy hillvalleyvpn attributesciscoasa(config-group-policy)#
Укажите политику раздельных туннелей. В данном случае используется политика excludespecified.ciscoasa(config-group-policy)#split-tunnel-policy excludespecified
Укажите список доступа к разделенным туннелям. В данном случае используется список Local_LAN_Access.ciscoasa(config-group-policy)#split-tunnel-network-list value Local_LAN_Access
Введите следующую команду:ciscoasa(config)#tunnel-group hillvalleyvpn general-attributes
Привяжите групповую политику к туннельной группеciscoasa(config-tunnel-ipsec)# default-group-policy hillvalleyvpn
Выйдите из обоих режимов конфигурирования.ciscoasa(config-group-policy)#exitciscoasa(config)#exitciscoasa#
Сохраните конфигурацию в энергонезависимой памяти (NVRAM) и нажмите клавишу ВВОД, когда будет предложено указать имя файла источника. ciscoasa#copy running-config startup-configSource filename ?Cryptochecksum: 93bb3217 0f60bfa4 c36bbb29 75cf714a3847 bytes copied in 3.470 secs (1282 bytes/sec)ciscoasa#
Editing the registry
Once you’ve made your way through the Cisco VPN client install wizard, it’s time to break out everyone’s favorite registry editor, namely Regedit. In Windows 10, you can access Regedit by typing it into the search bar (to the right of the Start button) or by using the shortcut Win + R and typing Regedit there. Whatever your preference, open Regedit.
Next – you guessed it – you’re going to make a quick registry edit. At one time, this step was optional, but since the Creators Update arrived, it’s pretty much mandatory in most cases.
With Regedit open, locate the registry key HKEY_LOCAL_MACHINE and click the drop-down icon. Then do this again for System, CurrentControlSet, Services, and finally, CVirtA.
From there, double-click DisplayName and change the value data to “Cisco Systems VPN Adapter” (without quotes) if you’re using the x86 32-bit version of the software or “Cisco Systems VPN Adapter for 64-bit Windows” (again, without quotes) if you’re on the 64-bit version.
For reference, the original value data entry should look like this:
32-bit (x86): @oem8.ifn,%CVirtA_Desc%;Cisco Systems VPN Adapter
64-bit (x64): @oem8.ifn,%CVirtA_Desc%;Cisco Systems VPN Adapter for 64-bit Windows
Once you’ve made the appropriate changes to your registry, restart Windows and you’re done.
The Cisco VPN client should now work as expected in Windows 10. However, if you’re continuing to run into trouble, we have a few extra steps you can take in the section below dedicated to troubleshooting.
We’ve debunked 6 common myths concerning VPNs
Загрузка дистрибутива Cisco VPN Client
Хочется сразу оговориться, что скачать Cisco VPN Client для Windows 10 x64, с официального сайта нет возможности.https://www.cisco.com Дистрибутив доступен лишь по партнерскому договору и только после оплаты. Бесплатная регистрация на портале также не принесет результатов.
В сети очень много предложено инсталляционных пакетов, но загрузка с того или иного портала и последствия для машины – полностью под Вашу ответственность. Что касается Cisco anyconnect VPN Client Windows 7 x64, то абсолютно бесплатно скачать можно с официального портала.https://www.cisco.com/assets/sol/sb/isa500_emulator/help/guide/ah1195632.html
Данная версия рассчитана для домашнего пользования и позволит пользователю установить дистрибутив на платформы:
- Linux Intel (ядро 2.6.x);
- Windows XP SP2 + (32-x и 64-x);
- Windows 7 (32-x и 64-x);
- Mac OS X 10.5, 10.6.x и 10.7.
Функционал Cisco VPN Client позволяет:
- обезопасить локальную сеть;
- сохранить полную анонимность в Internet и скрыть реальный IP адрес;
- подключаться к сети по защищенному каналу связи.
Licensing Requirements for the FIPS-Compliant VPN Client
The Cisco FIPS-compliant VPN client is licensed based on the ASA 5500 Series Adaptive Security Appliance model. Each security appliance model requires a different license. The license does not affect the number of allowed concurrent VPN sessions.
The following table shows the Product numbers (also called SKUs) of the licenses for each security appliance model:
|
Product Number(also called SKU) |
Security Appliance Model |
Description |
|
ASA-FPS-CL-5510= |
ASA 5510 |
FIPS-compliant VPN Client License |
|
ASA-FPS-CL-5520= |
ASA 5520 |
FIPS-compliant VPN Client License |
|
ASA-FPS-CL-5540= |
ASA 5540 |
FIPS-compliant VPN Client License |
|
ASA-FPS-CL-5580= |
ASA 5580 |
FIPS-compliant VPN Client License |
|
ASA-FPS-CL-5505= |
ASA 5505 |
FIPS-compliant VPN Client License |
|
ASA-FPS-CL-5550= |
ASA 5550 |
FIPS-compliant VPN Client License |
Note Each new security appliance model purchased after August 31st, 2009 requires a FIPS-compliant VPN client license. Cisco customers with current SMARTnet contracts who purchased an ASA 5500 Series Adaptive Security Appliance before August 31st, 2009 are not required to purchase a license for these specific appliances and may contact the Cisco TAC for information on upgrade rights for the FIPS-compliant VPN client.
Скулы
Говоря о рельефе лица, конечно же, первым делом мы остановимся на скулах. Именно скулы являются основным признаком женственности, именно их выделяют при любом макияже (для этого и существуют румяна).
Многие женщины, постоянно пользующиеся декоративной косметикой, умеют правильно рисовать скулы. Всем остальным мы предлагаем такую подсказку: мысленно проведите линию от уголка губ до верхней точки уха — область под этой линией мы и будем затемнять.
Если вы сомневаетесь, как далеко накладывать виртуальные «румяна» в направлении от уха ко рту, можете мысленно провести вертикальную линию через зрачок глаза. Она и будет для вас ориентиром. Залезете слишком далеко — получите «рыбье лицо».
Чтобы сделать скулу ещё более выпуклой, можно её осветлить (как вы уже поняли по схеме, осветляется область над красной линией).
При этом для осветления мы рекомендуем использовать кисть с меньшей непрозрачностью — параметр Opacity в районе 10%.
Конечно, для получения адекватного результата нужно потренироваться. К сожалению, многие горе-ретушёры, прекрасно владеющие технической стороной метода, уродуют своих моделей из-за непонимания анатомии женского лица. Как минимум, вы должны представлять, где эти самые скулы должны быть, и где они быть не могут. Кстати, тут тоже на помощь приходят многочисленные схемы, созданные для обучения визажистов — Гугл вам в помощь.
Настройка
В этом разделе содержатся сведения о настройке функций, описанных в этом документе.
Примечание. Для поиска дополнительной информации о командах, приведенных в данном документе, используйте инструмент Средство поиска команд (только для зарегистрированных пользователей).
Схема сети
В настоящем документе используется следующая схема сети:
Примечание. Схемы IP-адресации, используемые в этой конфигурации, нельзя использовать для маршрутизации в Интернете. Это адреса RFC 1918 , которые использовались в лабораторной среде.
Варианты конфигурации
В этом документе используются следующие конфигурации:
|
Маршрутизатор |
|---|
VPN#show run Building configuration... Current configuration : 2170 bytes ! version 12.4 service timestamps debug datetime msec service timestamps log datetime msec no service password-encryption ! hostname VPN ! boot-start-marker boot-end-marker ! ! aaa new-model ! aaa authentication login userauthen local aaa authorization network groupauthor local ! aaa session-id common ! resource policy ! ! username user password 0 cisco ! ! ! crypto isakmp policy 3 encr 3des authentication pre-share group 2 crypto isakmp client configuration group vpnclient key cisco123 dns 10.10.10.10 wins 10.10.10.20 domain cisco.com pool ippool acl 101 ! crypto ipsec transform-set myset esp-3des esp-md5-hmac ! crypto dynamic-map dynmap 10 set transform-set myset reverse-route ! crypto map clientmap client authentication list userauthen crypto map clientmap isakmp authorization list groupauthor crypto map clientmap client configuration address respond crypto map clientmap 10 ipsec-isakmp dynamic dynmap ! ! ! ! interface Ethernet0/0 ip address 10.10.10.1 255.255.255.0 half-duplex ip nat inside interface FastEthernet1/0 ip address 172.16.1.1 255.255.255.0 ip nat outside ip virtual-reassembly duplex auto speed auto crypto map clientmap ! interface Serial2/0 no ip address ! interface Serial2/1 no ip address shutdown ! interface Serial2/2 no ip address shutdown ! interface Serial2/3 no ip address shutdown ! ip local pool ippool 192.168.1.1 192.168.1.2 ip http server no ip http secure-server ! ip route 0.0.0.0 0.0.0.0 172.16.1.2 ip nat inside source list 111 interface FastEthernet1/0 overload ! access-list 111 deny ip 10.10.10.0 0.0.0.255 192.168.1.0 0.0.0.255 access-list 111 permit ip any any access-list 101 permit ip 10.10.10.0 0.0.0.255 192.168.1.0 0.0.0.255 control-plane ! line con 0 line aux 0 line vty 0 4 ! end |
Настройка VPN Client 4.8
Чтобы настроить VPN Client 4.8, выполните следующие действия.
-
Выберите Пуск > Программы > Cisco Systems VPN Client > VPN Client.
-
Нажмите New, чтобы открыть окно «Create New VPN Connection Entry» (Создание новой записи VPN-соединения).
-
Введите имя записи подключения и его описание, а также внешний IP-адрес маршрутизатора в поле «Host» и имя и пароль группы VPN. Нажмите Save.
-
Выберите подключение, которое необходимо использовать, и нажмите Connect в главном окне VPN Client.
-
При появлении соответствующего запроса введите имя пользователя и пароль для аутентификации Xauth и нажмите OK для подключения к удаленной сети.
-
ПО VPN Client соединится с маршрутизатором на центральном узле.
-
Выберите Status > Statistics, чтобы проверить статистику туннеля для VPN Client.
-
Перейдите на вкладку «Route Details» (Сведения о маршруте), чтобы увидеть маршруты маршрутизатору, защищенные клиентом VPN.
В этом примере клиент VPN защищает доступ к сети 10.10.10.0/24, а весь остальной трафик не шифруется и не отправляется по туннелю. Защищенная сеть загружается из ACL 101, который настроен на маршрутизаторе центрального узла.
Похожие приложения
Resolved Caveats
shows the caveats that Release 5.0.07 resolves.
Table 2 Resolved Caveats
ID
Headline
CSCsi26001
unity xp-vista: reauth on rekey with saved password causes disconnect
CSCsr08760
VPN client does not handle IP option properly under Vista
CSCsr11437
IGMP packets from the Vista discovery service are getting encapsulated
CSCta07697
SetMTU needs to support Dial-Up Networking on Vista.
CSCta96341
ENH: unity client with SBL shows error message with firewall detected
CSCtb00682
VPN Client can’t connect for certain period after forcible termination
CSCtb85181
VPN Client will not connect to headend if PCF is read only
CSCtd08761
PC reboots if physical link is disrupted during a VPN connection
How the VPN 3000 Concentrator Uses User and Group Attributes
After the VPN 3000 Concentrator has authenticated the User and Group(s), it must organize the attributes it has received. The VPN Concentrator uses the attributes in this order of preference. It does not matter if the authentication was done internally or externally:
-
User attributes—These take precedence over all others.
-
Group attributes—Any attributes missing from the User attributes are filled in by the Group attributes. Any that are the same are overridden by the User attributes.
-
Tunnel Group attributes—Any attributes missing from the User or Group attributes are filled in by the Tunnel Group attributes. Any that are the same are overridden by the User attributes.
-
Base Group attributes—Any attributes missing from the User, Group, or Tunnel Group attributes are filled in by the Base Group attributes.
Troubleshooting and post-installation
If you’re still having trouble installing, running or using the Cisco VPN client with Windows 10, our best advice is to backtrack.
Most commonly, users will neglect to install the SonicWall client first, resulting in Error 433 when they try to connect. If this is happening to you, go back and install SonicWall prior to the Cisco VPN client, so that you have a DNE Lightweight filter ingrained in your system.
Once you’ve gone through and installed both programs – unzipping and renaming the Cisco VPN client installer in the process – edited the registry and rebooted your machine, you can go ahead and remove SonicWall in Settings > Add or remove programs, or in Control Panel > Programs > Programs and Features. Restart your computer again and the Cisco VPN client should still work.
If you’ve done everything in this guide (and in your power) to get the Cisco VPN client up and running in Windows 10 with no success, as a last resort you can reset all networking in Windows 10. This can be accomplished rather effortlessly.
First, run Command Prompt with administrative privileges by right-clicking it in the search bar and selecting “Run as administrator.” Then type “netcfg -d” (without quotes). Press enter. Reboot. That’s all there is to it.
We’ve also highlighted the best VPN services of 2019
Prerequisites
Requirements
Ensure that you meet these requirements before you attempt this configuration:
- SSL-enabled browser
- ASA with Version 7.1 or higher
- X.509 certificate issued to the ASA domain name
- TCP port 443, which must not be blocked along the path from the client to the ASA
Components Used
The information in this document is based on these software and hardware versions:
- ASA Version 9.4(1)
- Adaptive Security Device Manager (ASDM) Version 7.4(2)
- ASA 5515-X
The information in this document was created from the devices in a specific lab environment. All the devices used in this document began with a cleared (default) configuration. If your network is live, make sure that you understand the potential impact of any command.
Прогресс отправки
Событие срабатывает только на стадии загрузки ответа с сервера.
А именно: если мы отправляем что-то через -запрос, сперва отправит наши данные (тело запроса) на сервер, а потом загрузит ответ сервера. И событие будет срабатывать только во время загрузки ответа.
Если мы отправляем что-то большое, то нас гораздо больше интересует прогресс отправки данных на сервер. Но тут не поможет.
Существует другой объект, без методов, только для отслеживания событий отправки: .
Он генерирует события, похожие на события , но только во время отправки данных на сервер:
- – начало загрузки данных.
- – генерируется периодически во время отправки на сервер.
- – загрузка прервана.
- – ошибка, не связанная с HTTP.
- – загрузка успешно завершена.
- – вышло время, отведённое на загрузку (при установленном свойстве ).
- – загрузка завершена, вне зависимости от того, как – успешно или нет.
Примеры обработчиков для этих событий:
Пример из реальной жизни: загрузка файла на сервер с индикацией прогресса:
Configure
Step 1. Confirm License is Enabled
The first step when AnyConnect is configured on an IOS Router headend is to confirm that the license has been correctly installed (if applicable) and enabled. Refer to the licensing information in the previous section for the licensing specifics on different versions. It depends on the version of code and platform whether the show license lists an SSL_VPN or securityk9 license. Regardless of the version and license, the EULA will need to be accepted and the license will show as Active.
Step 2. Upload and Install AnyConnect Secure Mobility Client Package on Router
In order to upload an AnyConnect image to the VPN, the headend serves two purposes. Firstly, only operating systems that have AnyConnect images present on the AnyConnect headend will be permitted to connect. For example, Windows clients require a Windows package to be installed on the headend, Linux 64-bit clients require a Linux 64-bit package, and so on. Secondly, the AnyConnect image installed on the headend will automatically be pushed down to the client machine upon connection. Users that connect for the first time will be able to download the client from the web portal and users that return will be able to upgrade, provided the AnyConnect package on the headend is newer than what is installed on their client machine. AnyConnect packages can be obtained through the AnyConnect Secure Mobility Client section of the Cisco Software Downloads website. While there are many options available, the packages which are to be installed on the headend will be labeled with the operating system and Head-end deployment (PKG). AnyConnect packages are currently available for these operating system platforms: Windows, Mac OS X, Linux (32-bit), and Linux 64-bit. Note that for Linux, there are both 32 and 64-bit packages. Each operating system requires the proper package to be installed on the headend in order for connections to be permitted. Once the AnyConnect package has been downloaded, it can be uploaded to the Router’s flash with the copy command via TFTP, FTP, SCP, or a few other options. Here is an example:
copy tftp: flash:/webvpn/

Address or name of remote host []? 192.168.100.100
Source filename []? anyconnect-win-3.1.08009-k9.pkg
Destination filename [/webvpn/anyconnect-win-3.1.08009-k9.pkg]?
Accessing tftp://192.168.100.100/anyconnect-win-3.1.08009-k9.pkg...
Loading anyconnect-win-3.1.08009-k9.pkg from 192.168.100.100 (via GigabitEthernet0): !!!!!!!!!!!!!
!!!!!!!!!!!!!!!!!!!!!!!!!!!!!!!!!!!!!!!!!!!!!!!!!!!!!!!!!!!!!!!!!!!!!!!!!!!!!!!!!!!!!!!!!!!!!!!!!!
!!!!!!!!!!!!!!!!!!!!!!!!!!!!!!!!!!!!!!


37997096 bytes copied in 117.644 secs (322984 bytes/sec)
After you copy the AnyConnect image to the flash of the Router, it must be installed via the command line. Multiple AnyConnect packages can be installed when you specify a sequence number at the end of the installation command; this will allow for the Router to act as headend for multiple client operating systems. When you install the AnyConnect package, it will also move it to the flash:/webvpn/ directory if it was not copied there initially.
crypto vpn anyconnect flash:/webvpn/anyconnect-win-3.1.08009-k9.pkg sequence 1

SSLVPN Package SSL-VPN-Client (seq:1): installed successfully
On versions of code that were released before 15.2(1)T, the command to install the PKG is slightly different.
Install AnyConnect Secure Mobility Client
Licensing Information
This toggled section provides details on Anyconnect licensing.
AnyConnect client licenses allow the use of the AnyConnect desktop clients as well
as
any of the AnyConnect
mobile clients that are available. To try out AnyConnect on mobile devices:
Licensing Structure: Firmware versions 1.0.3.15 and later
As of March 2019, server licenses using
AnyConnect for RV34x fimware version 1.0.3.15 and later are no longer required. Now you will need only a
client license
to
download and use the Cisco AnyConnect Secure Mobility Client. A client license enables the VPN functionality
and
are
sold in packs of 25 from partners like CDW or through your company’s device procurement.
We recommend the following user license
for use with the RV340 Series:
Licensing Structure — Firmware versions
1.0.2.16
or
lower
If you have not yet updated your firmware, please do so now. Click
here
to
visit the downloads page for
the RV34X series. The server licenses for the old version are no longer available to purchase since
it
is no longer needed.
Want to know more about AnyConnect licensing? Here are some resources:
- .
- .
- AnyConnect Licensing FAQs.
Step 1
Download the Cisco AnyConnect VPN Client here.
Most users will select the AnyConnect Pre-deployment Package for Windows option. The images in this article are for AnyConnect v4.8.x which was latest version at the time of writing this document.
Step 2
Navigate Windows File Explorer to the installer file. Double-click the installer to initiate the installation process.
Check your Downloads folder to locate the AnyConnect files. Browser based downloads are often deposited into the downloads folder on your device on windows. The path to the file often resembles C:\Users\\Downloads with the C:/ referring to your devices storage drive.
Click Run.
Step 4
Check the check boxes for the modules that you need to install.
- Core & VPN — Includes AnyConnect core client with VPN capability.
- Start Before Login — User sees the AnyConnect GUI logon dialog before the Windows logon dialog box appears.
- Network Access Manager — It is a client software that provides a secure Layer 2 network.
- VPN Posture (Hostscan) — Provides the client the ability to identify the operating system, anti-virus, anti-spyware, and firewall software installed on the host.
- AMP Enabler — It is used as a medium for deploying Advanced Malware Protection (AMP) for endpoints.
- Network Visibility Module — Collects rich flow context from an endpoint on or off premise and provides visibility into network connected devices.
- Cloud Web Security — It is an endpoint component that routes HTTP traffic to a Cisco Cloud Web Security scanning proxy.
- Umbrella Roaming Security — Provides DNS-layer security when no VPN is active.
- ISE Posture — It is similar to VPN Posture; performs a client-side evaluation.
- Select All — Selects all modules.
- Diagnostic and Reporting Tool — It is used to collect data for troubleshooting AnyConnect installation and connection problems.
All modules will be installed by default.
Step 5
(Optional) Check the Lock Down Component Services check box if
the feature needs to be enabled. Enabling this feature will prevent users from disabling the Windows Web
Security
service.
In this example, Lock Down Component Services is not enabled.
Click Install Selected.
Click OK.
Verify
Use this section to confirm that your configuration works properly.
Procedure
Complete these procedures in order to confirm your configuration works properly:
-
Test your configuration with a user. Enter https://WebVPN_Gateway_IP_Address into an SSL-enabled Web browser; where WebVPN_Gateway_IP_Address is the IP address of the WebVPN service. After you accept the certificate and enter a user name and password, a screen similar to this image should appear.
-
Check the SSL VPN session. Within the SDM application, click the Monitor button, and then click VPN Status. Expand WebVPN (All Contexts), expand the appropriate context, and choose Users.
-
Check error messages. Within the SDM application, click the Monitor button, click Logging, and then click the Syslog tab.
-
View the running configuration for the device. Within the SDM application, click the Configure button, and then click Additional Tasks. Expand Configuration Management, and choose Config Editor.
Commands
Several show commands are associated with WebVPN. You can execute these commands at the command-line interface (CLI) to show statistics and other information. For detailed information about show commands, refer to .
Note: The Output Interpreter Tool (registered customers only) (OIT) supports certain show commands. Use the OIT to view an analysis of show command output.
Поймите, какая у вашего письма цель
Аналогия: каждая ЛВС как остров
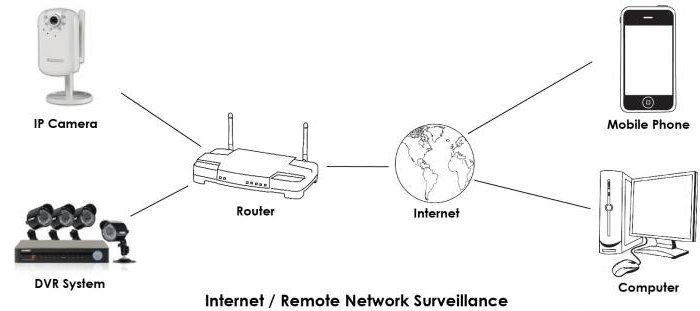
Представьте, что вы живете на острове посреди огромного океана. Вокруг вас разбросаны тысячи других островов, одни из них находятся ближе другие дальше. Обычный способ перемещения — это воспользоваться переправой между вашим островом и тем островом, куда нужно попасть. Перемещение переправой означает, что у вас практически отсутствует секретность. Все что вы делаете может увидеть кто-либо другой.
Проведем следующую аналогию: каждый остров представляет частную LAN, а океан — это Интернет. Перемещение переправой аналогично подключению к веб-серверу или другому устройству через Интернет. Вы не контролируете провода и маршрутизаторы, составляющие Интернет, это подобно отсутствию контроля над другими людьми, находящимися на средстве переправы. Это оставляет вас беззащитным перед проблемами с безопасностью при попытке установить соединение между двумя частными сетями, используя общий ресурс.
Ваш остров решает навести мост с другим островом, чтобы появился более легкий, безопасный и прямой путь для перемещения людей между островами. Наведение и содержание моста — дорогостоящая процедура, даже если эти острова находятся на очень близком расстоянии один от другого. Однако потребность в надежном и безопасном пути настолько велика, что вы решаетесь на этот шаг. Ваш остров хотел бы соединиться со вторым островом, который находится гораздо дальше первого, но вы решаете, что это слишком дорого.
Возникновение такой ситуации очень вероятно при использовании выделенной линии. Мосты (выделенные линии) отделены от океана (Интернет) и при этом они способны соединять острова (LAN). Многие компании выбрали этот путь из-за потребности в безопасной и надежной связи между своими удаленными офисами. Однако, если офисы находятся на очень большом расстоянии один от другого, стоимость может оказаться чрезмерно высокой — это подобно ситуации, когда нужно возводить очень длинный мост.
Какое место VPN занимает в этой аналогии? Каждому обитателю таких островов можно предоставить свою собственную небольшую подводную лодку, обладающую следующими свойствами.
-
Быстрота.
-
Легкое управление в нужном направлении.
-
Полная невидимость для остальных средств переправы и подводных лодок.
-
Надежность.
-
После приобретения первой подводной лодки, стоимость приобретения дополнительных субмарин становится небольшой.
Хотя они плавают в океане вместе с остальными лодками, обитатели двух островов могут перемещаться туда и обратно в любое время, сохраняя секретность и безопасность. Именно в этом и заключается сущность функционирования VPN. Каждый удаленный пользователь вашей сети может взаимодействовать безопасным и надежным способом, используя Интернет в качестве среды для подключения к частной LAN. VPN гораздо легче расширяется добавлением новых пользователей и различных расположений чем выделенная линия. На самом деле, масштабируемость — это основное преимущество VPN в сравнении с типичными выделенными линиями. В отличие от выделенных линий, где стоимость возрастает прямо пропорционально протяженности соединения, географическое расположение каждого офиса имеет меньшее значение при создании VPN.
python — как удалить строку из csv, если она содержит определенное слово?
Introduction
These release notes are for the CiscoFIPS-compliant VPN Client, Release 5.0.07.0291-FIPS. The name of the file on the software download site is vpnclient-win-msi-5.0.07.0291-k9.exe.
Note The Cisco FIPS-compliant VPN Client is based on the Cisco VPN Client, Release 5.0.07. If you do not require FIPS compliance for your organization, please download the standard release of the Cisco VPN Client.
The Federal Information Processing Standard (FIPS) 140-2 is a U.S. government standard for specific security requirements for cryptographic modules. This standard applies to all federal agencies that use cryptographic-based security systems to protect sensitive information in computer and telecommunication systems.
The VPN Client creates a secure connection over the Internet between a remote PC and an enterprise or service provider Cisco VPN device. This connection lets you access a private network as if you were an on-site user.
This document identifies the system requirements, limitations and restrictions, known issues, resolved caveats, and related documentation. Please read it carefully prior to installation. The section, «,» describes interoperability considerations and other issues you should be aware of when installing and using the VPN Client.
Что это за программа?
Итак, изначально давайте разберемся, что же это за приложение, и какими возможностями оно обладает. Список основных, а также дополнительных функций клиента Cisco AnyConnect можно выразить примерно следующим образом:
- Поддерживается доступ к корпоративной сети с любого устройства, включая компьютер или телефон.
- Расширенные возможности мониторинга. Модуль мониторинга сети, который входит в состав приложения, отслеживает деятельность каждого ее участника. На основе этих данных создается максимальная безопасность и анонимность.
- Всесторонняя защита. Устройства, которые не отвечают базовым условиям безопасности, подвергаются особой защите при помощи модуля Cisco Identity Services Engine (ISE).
- Простота управления и использования. Благодаря применению единого агента, с программой намного легче работать.
- Широкий набор функций и гибкие варианты лицензирования.
- Расширенный мониторинг сети.
- Улучшение прозрачности и управляемости.
Данный список включает не все возможности приложения, о котором мы сегодня рассказываем. Остальные нюансы станут понятными при более близком знакомстве с программой.
Как пользоваться
Теперь, когда мы рассмотрели процесс установки Cisco AnyConnect Asa на компьютер и телефон, можно переходить дальше и рассказывать, как пользоваться данным приложением. Аналогично приведенной выше пошаговой инструкции, мы разберем процесс эксплуатации Cisco AnyConnect для ПК и смартфона отдельно.
Работаем с ПК
Раз уж мы начали с установки программы для компьютера, инструкцию по работе с ней тоже будем рассматривать для данной платформы. Как только приложение будет запущено (для этого, как мы уже говорили, можно использовать меню «Пуск» Windows), следует сразу перейти к его настройкам и активировать блокировку серверов с низким доверием (blocked untrusted server). Это защитит пользователя от потери личных данных.
Дальше переходим на вкладку VPN и жмем по обозначенной на скриншоте ниже кнопке.
В результате запустятся настройки ОС, в которых мы можем добавить данные VPN, а также настроить его использование.
Вот и все, на компьютере основные настройки данного приложения выглядит именно так.
На смартфоне
На телефоне, сразу после того, как мы запустим программу, нам понадобится принять лицензионное соглашение Cisco AnyConnect. Для этого жмем кнопку, обозначенную красной рамкой.
В первую очередь необходимо запустить настройки приложения, нажав на иконку с изображением трех вертикальных точек, расположенную в правом верхнем углу окна.
Дальше в выпадающем меню мы жмем по «Settings».
Настройки программы содержат следующие пункты:
- Скрытие значка приложения в строке состояния.
- Отключение внешнего управления со стороны других приложений.
- Блокировка недоверенных серверов.
- Активация режима FIPS VPN.
- Включение проверки отзывов сертификатов OCSP.
- Включение проверки и строгого доверия сертификату.
Для того чтобы запустить защищенное соединение нам необходимо нажать на обозначенную ниже иконку.
Дальше мы должны активировать отмеченный на скриншоте переключатель.
Соответственно, при помощи этого же триггера можно отключиться от защищенной сети.
Следующий пункт переводит нас к дополнительным настройкам.
Например, мы можем добавить здесь новое VPN-подключение.
Присутствует описание будущего соединения, графа для внесения настроек сервера, а также дополнительные параметры, включающие в себя, например, расширенные настройки сертификата протокола.
На iPhone последовательность действий для установки выглядит похожим образом. Отличие заключается лишь в том, что мы вместо Google Play Market посещаем Apple AppStore. Затем, воспользовавшись поиском, находим нужную нам программу и автоматически скачиваем ее.