Overview
Содержание:
- Components
- Альбомный вид в Ворд 2010 и 2013
- What is Bootstrap?
- Source files
- Inline text elements
- Example tabs
- Reordering
- Условия вкладов
- Contextual classes
- Распаковка архива Bootstrap
- Пользовательские компоненты
- Two Basic Bootstrap Pages
- Internet Explorer 10 на Windows 8 и Windows Phone 8
- Печать
- Horizontal
- Bootstrap CDN
- Headings
- Example in navbar
- Reordering
- Auto-layout columns
- С чего начать изучение Bootstrap?
- I. Начало работы
- Видео как пользоваться Ускорителем Компьютера?
- Examples
- Z-index
- Community
- Как получить и вернуть средства?
- Horizontal
- Горизонтальная форма
Components
Many of Bootstrap’s components and utilities are built with loops that iterate over a Sass map. This is especially helpful for generating variants of a component by our and creating responsive variants for each breakpoint. As you customize these Sass maps and recompile, you’ll automatically see your changes reflected in these loops.
Modifiers
Many of Bootstrap’s components are built with a base-modifier class approach. This means the bulk of the styling is contained to a base class (e.g., ) while style variations are confined to modifier classes (e.g., ). These modifier classes are built from the map to make customizing the number and name of our modifier classes.
Here are two examples of how we loop over the map to generate modifiers to the component and all our background utilities.
Responsive
These Sass loops aren’t limited to color maps, either. You can also generate responsive variations of your components or utilities. Take for example our responsive text alignment utilities where we mix an loop for the Sass map with a media query include.
Should you need to modify your , your changes will apply to all the loops iterating over that map.
Альбомный вид в Ворд 2010 и 2013
What is Bootstrap?
- Bootstrap is a free front-end framework for faster and easier web development
- Bootstrap includes HTML and CSS based design templates for typography, forms, buttons, tables, navigation, modals, image carousels and many other, as well as optional JavaScript plugins
- Bootstrap also gives you the ability to easily create responsive designs
What is Responsive Web Design?
Responsive web design is about creating web sites which automatically adjust
themselves to look good on all devices, from small phones to large desktops.
Bootstrap Example
<div class=»jumbotron text-center»> <h1>My First Bootstrap Page</h1> <p>Resize this responsive page to see the effect!</p> </div><div class=»container»> <div class=»row»>
<div class=»col-sm-4″> <h3>Column 1</h3> <p>Lorem ipsum
dolor..</p> </div> <div class=»col-sm-4″> <h3>Column 2</h3> <p>Lorem ipsum
dolor..</p> </div> <div class=»col-sm-4″> <h3>Column 3</h3> <p>Lorem ipsum
dolor..</p> </div> </div></div>
Source files
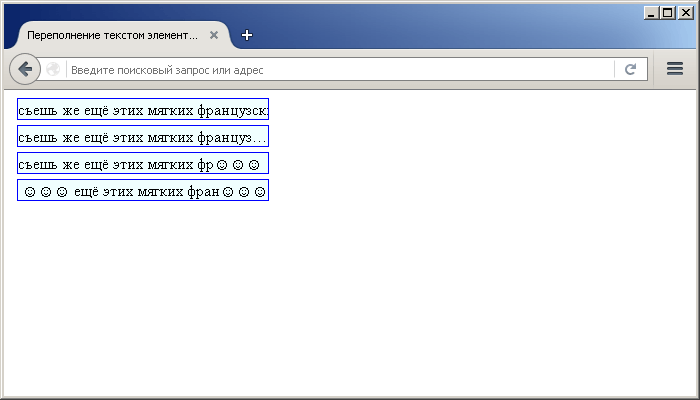
Inline text elements
Styling for common inline HTML5 elements.
You can use the mark tag to highlight text.
This line of text is meant to be treated as deleted text.
This line of text is meant to be treated as no longer accurate.
This line of text will render as underlined
This line of text is meant to be treated as fine print.
This line rendered as bold text.
This line rendered as italicized text.
and classes are also available to apply the same styles as and while avoiding any unwanted semantic implications that the tags would bring.
While not shown above, feel free to use and in HTML5. is meant to highlight words or phrases without conveying additional importance while is mostly for voice, technical terms, etc.
Example tabs
Add quick, dynamic tab functionality to transition through panes of local content, even via dropdown menus. Nested tabs are not supported.
Raw denim you probably haven’t heard of them jean shorts Austin. Nesciunt tofu stumptown aliqua, retro synth master cleanse. Mustache cliche tempor, williamsburg carles vegan helvetica. Reprehenderit butcher retro keffiyeh dreamcatcher synth. Cosby sweater eu banh mi, qui irure terry richardson ex squid. Aliquip placeat salvia cillum iphone. Seitan aliquip quis cardigan american apparel, butcher voluptate nisi qui.
Food truck fixie locavore, accusamus mcsweeney’s marfa nulla single-origin coffee squid. Exercitation +1 labore velit, blog sartorial PBR leggings next level wes anderson artisan four loko farm-to-table craft beer twee. Qui photo booth letterpress, commodo enim craft beer mlkshk aliquip jean shorts ullamco ad vinyl cillum PBR. Homo nostrud organic, assumenda labore aesthetic magna delectus mollit. Keytar helvetica VHS salvia yr, vero magna velit sapiente labore stumptown. Vegan fanny pack odio cillum wes anderson 8-bit, sustainable jean shorts beard ut DIY ethical culpa terry richardson biodiesel. Art party scenester stumptown, tumblr butcher vero sint qui sapiente accusamus tattooed echo park.
Etsy mixtape wayfarers, ethical wes anderson tofu before they sold out mcsweeney’s organic lomo retro fanny pack lo-fi farm-to-table readymade. Messenger bag gentrify pitchfork tattooed craft beer, iphone skateboard locavore carles etsy salvia banksy hoodie helvetica. DIY synth PBR banksy irony. Leggings gentrify squid 8-bit cred pitchfork. Williamsburg banh mi whatever gluten-free, carles pitchfork biodiesel fixie etsy retro mlkshk vice blog. Scenester cred you probably haven’t heard of them, vinyl craft beer blog stumptown. Pitchfork sustainable tofu synth chambray yr.
Trust fund seitan letterpress, keytar raw denim keffiyeh etsy art party before they sold out master cleanse gluten-free squid scenester freegan cosby sweater. Fanny pack portland seitan DIY, art party locavore wolf cliche high life echo park Austin. Cred vinyl keffiyeh DIY salvia PBR, banh mi before they sold out farm-to-table VHS viral locavore cosby sweater. Lomo wolf viral, mustache readymade thundercats keffiyeh craft beer marfa ethical. Wolf salvia freegan, sartorial keffiyeh echo park vegan.
Reordering
Order classes
Use classes for controlling the visual order of your content. These classes are responsive, so you can set the by breakpoint (e.g., ). Includes support for through across all five grid tiers.
First, but unordered
Second, but last
Third, but first
There are also responsive and classes that change the of an element by applying and (), respectively. These classes can also be intermixed with the numbered classes as needed.
First, but last
Second, but unordered
Third, but first
Offsetting columns
You can offset grid columns in two ways: our responsive grid classes and our margin utilities. Grid classes are sized to match columns while margins are more useful for quick layouts where the width of the offset is variable.
Offset classes
Move columns to the right using classes. These classes increase the left margin of a column by columns. For example, moves over four columns.
.col-md-4
.col-md-4 .offset-md-4
.col-md-3 .offset-md-3
.col-md-3 .offset-md-3
.col-md-6 .offset-md-3
In addition to column clearing at responsive breakpoints, you may need to reset offsets. See this in action in the grid example.
.col-sm-5 .col-md-6
.col-sm-5 .offset-sm-2 .col-md-6 .offset-md-0
.col-sm-6 .col-md-5 .col-lg-6
.col-sm-6 .col-md-5 .offset-md-2 .col-lg-6 .offset-lg-0
Margin utilities
With the move to flexbox in v4, you can use margin utilities like to force sibling columns away from one another.
.col-md-4
.col-md-4 .ml-auto
.col-md-3 .ml-md-auto
.col-md-3 .ml-md-auto
.col-auto .mr-auto
.col-auto
Условия вкладов
Contextual classes
Use contextual classes to style list items with a stateful background and color.
- Dapibus ac facilisis in
- A simple primary list group item
- A simple secondary list group item
- A simple success list group item
- A simple danger list group item
- A simple warning list group item
- A simple info list group item
- A simple light list group item
- A simple dark list group item
Contextual classes also work with . Note the addition of the hover styles here not present in the previous example. Also supported is the state; apply it to indicate an active selection on a contextual list group item.
Conveying meaning to assistive technologies
Using color to add meaning only provides a visual indication, which will not be conveyed to users of assistive technologies – such as screen readers. Ensure that information denoted by the color is either obvious from the content itself (e.g. the visible text), or is included through alternative means, such as additional text hidden with the class.
Распаковка архива Bootstrap
После скачивания архива (с готовыми к применению CSS и JavaScript файлами), его необходимо распаковать в каталог вашего веб-проекта.
Если рассмотреть архив, то можно заметить, что он имеет следующее содержимое (на примере Bootstrap 3.4.1):
bootstrap/
├── css/
│   ├── bootstrap.css
│   ├── bootstrap.min.css
│   ├── bootstrap-theme.css
│   └── bootstrap-theme.min.css
├── js/
│   ├── bootstrap.js
│   └── bootstrap.min.js
└── fonts/
    ├── glyphicons-halflings-regular.eot
    ├── glyphicons-halflings-regular.svg
    ├── glyphicons-halflings-regular.ttf
    └── glyphicons-halflings-regular.woff
В каталоге находятся стили фреймворка Bootstrap, а в — плагины для обеспечения работы некоторых компонентов. Плагины написаны с использованием функций библиотеки jQuery. Поэтому перед Bootstrap JS необходимо подключить библиотеку jQuery.
Как вы можете заметить, в архиве есть 2 версии CSS и JavaScript файлов, т.е. с суффиксом min и без него. Версия файла с min ничем ни отличается от без min, она просто минимизирована (сжата).
В продакшене (на рабочем сайте) лучше использовать минимизированные версии файлов. Эти файлы имеют меньший размер, и, следовательно, обеспечивают более быструю загрузку страниц сайта.
Не минимизированные версии более удобно использовать при разработке, а также для изучения.
Кроме этих файлов, в данный архив ещё входит иконочный шрифт «Glyphicons». Шрифт «Glyphicons» насчитывает более 250 иконок из набора «Glyphicon Halflings». Шрифт представлен с помощью 4 файлов: , , , ).
Такое разнообразие форматов одного и того же шрифта необходимо для того чтобы обеспечить его отображение во всех браузерах.
Архив фреймворка Bootstrap 4 практически ничем ни отличается от Bootstrap 3. Основное его отличие в том, что он не содержит шрифт «Glyphicons». Если вам нужны шрифтовые иконки, то их необходимо будет подключить самостоятельно. Например, воспользовавшись одним из следующих наборов: FontAwesome, Octicons, Glyphicons, IcoMoon или др. Если же вы не хотите использовать готовый шрифт, а создать свой, который будет состоять только из нужных значков, то воспользуйтесь этой информацией.
Кроме этого архив Bootstrap 4 содержит ещё файлы и . Данные файлы необходимы только тем, кому нужен не целый фреймворк, а только его часть.
Первый файл () содержит сетку Bootstrap, а второй () — нормализатор, который устанавливает базовые стили, для того чтобы они у всех HTML-элементов во всех браузерах были одинаковыми.
Пользовательские компоненты
Одностраничный шаблон для построения простых и красивых домашних страниц.
Сочетание в шаблоне нав. меню и карусели, с добавлением некоторых новых компонентов.
Простой блог в две колонки с пользовательской навигацией, заголовком, и видом.
Базовая структура для администратора приборная панель с фиксированным боковым меню и панели навигации.
Шаблон пользовательской формы настроен для простого входа на сайт.
Создание компонованого нав. меню с выровненными ссылками
Внимание!
Закрепление колонтитула в нижней части браузера для случая, когда высота контента сама собой не делает этого.
Two Basic Bootstrap Pages
The following example shows the code for a basic Bootstrap page (with a responsive fixed width container):
Example
<!DOCTYPE html><html lang=»en»><head> <title>Bootstrap Example</title> <meta charset=»utf-8″> <meta name=»viewport» content=»width=device-width, initial-scale=1″> <link rel=»stylesheet» href=»https://maxcdn.bootstrapcdn.com/bootstrap/3.4.1/css/bootstrap.min.css»>
<script src=»https://ajax.googleapis.com/ajax/libs/jquery/3.5.1/jquery.min.js»></script>
<script src=»https://maxcdn.bootstrapcdn.com/bootstrap/3.4.1/js/bootstrap.min.js»></script>
</head><body><div class=»container»> <h1>My First Bootstrap Page</h1> <p>This is some text.</p> </div></body></html>
The following example shows the code for a basic Bootstrap page (with a full width container):
Example
<!DOCTYPE html><html lang=»en»><head> <title>Bootstrap Example</title> <meta charset=»utf-8″> <meta name=»viewport» content=»width=device-width, initial-scale=1″> <link rel=»stylesheet» href=»https://maxcdn.bootstrapcdn.com/bootstrap/3.4.1/css/bootstrap.min.css»>
<script src=»https://ajax.googleapis.com/ajax/libs/jquery/3.5.1/jquery.min.js»></script>
<script src=»https://maxcdn.bootstrapcdn.com/bootstrap/3.4.1/js/bootstrap.min.js»></script></head><body><div class=»container-fluid»> <h1>My First Bootstrap Page</h1> <p>This is some text.</p> </div></body></html>
❮ Previous
Next ❯
Internet Explorer 10 на Windows 8 и Windows Phone 8
Интернет Эксплорер 10 не отличает ширину устройства с шириной окна просмотра, и, следовательно, неправильно применяет медиа запросы в CSS Bootstrap. Как правило, вы могли бы просто добавить быстрый фрагмент CSS чтобы исправить это:
Однако, это не работает для устройств, работающих под управлением Windows Phone 8 версий старше, чем Обновления 3 (а.к.а. GDR3), поскольку это вызывает такие устройства, чтобы главным образом показать основной рабочий стол вместо узкого «phone» view. Для решения этой проблемы вам необходимо включать следующие CSS и JavaScript, чтобы обойти ошибку.
Для получения дополнительной информации и руководства по использованию, просмотрите Windows Phone 8 и Device-Width.
Один за одним, мы включаем это в документацию и примеры Bootstrap в качестве демонстрации.
Печать
Даже в некоторых современных браузерах, для обеспечения печати приходится изловчиться.
В частности, в Chrome версии 32 независимо от параметров отступов и размеров полей, Chrome при печати использует значительно более узкую область просмотра, чем физический размер бумаги при отображении медиа запросов. Это может привести к тому, при печати Bootstrap неожиданно активирует очень мелкую сетку. и Ошибке Chrome #273306. Рекомендуемые обходные пути:
- Примените extra-small разметку и убедитесь, что ваша страница выглядит приемлемо.
- Настройка значения Less переменных, чтобы ваш бумага для принтера рассматривалась больше, чем extra-small.
- Добавить Пользовательское медиа запросы изменение грид Размер точки останова для печати медиа только.
Также, как Сафари и v8.0, фиксированной ширины может вызвать Сафари использовать необычайно маленький размер шрифта при печати. См. #14868 и В WebKit ошибка #138192 Для более подробной информации. Одним из возможных обойти это, добавив следующие CSS:
Horizontal
Add to change the layout of list group items from vertical to horizontal across all breakpoints. Alternatively, choose a responsive variant to make a list group horizontal starting at that breakpoint’s . Currently horizontal list groups cannot be combined with flush list groups.
ProTip: Want equal-width list group items when horizontal? Add to each list group item.
- Cras justo odio
- Dapibus ac facilisis in
- Morbi leo risus
- Cras justo odio
- Dapibus ac facilisis in
- Morbi leo risus
- Cras justo odio
- Dapibus ac facilisis in
- Morbi leo risus
- Cras justo odio
- Dapibus ac facilisis in
- Morbi leo risus
- Cras justo odio
- Dapibus ac facilisis in
- Morbi leo risus
Bootstrap CDN
If you don’t want to download and host Bootstrap yourself, you can include it from a CDN (Content Delivery Network).
MaxCDN provides CDN support for Bootstrap’s CSS and JavaScript. You must also include jQuery:
MaxCDN:
<!— Latest compiled and minified CSS —><link rel=»stylesheet» href=»https://maxcdn.bootstrapcdn.com/bootstrap/3.4.1/css/bootstrap.min.css»><!— jQuery library —><script src=»https://ajax.googleapis.com/ajax/libs/jquery/3.5.1/jquery.min.js»></script><!— Latest compiled JavaScript —><script src=»https://maxcdn.bootstrapcdn.com/bootstrap/3.4.1/js/bootstrap.min.js»></script>
One advantage of using the Bootstrap CDN:
Many users already have downloaded
Bootstrap from MaxCDN when visiting
another site. As a result, it will be loaded from cache when they visit your site, which leads to faster loading time.
Also, most CDN’s will make sure that once a user requests a file from it, it will be served
from the server closest to them, which also leads to faster loading time.
jQueryBootstrap uses jQuery for JavaScript plugins (like modals, tooltips, etc). However, if you just use the
CSS part of Bootstrap, you don’t need jQuery.
Headings
All HTML headings, through , are available.
| Heading | Example |
|---|---|
| h1. Bootstrap heading | |
| h2. Bootstrap heading | |
| h3. Bootstrap heading | |
| h4. Bootstrap heading | |
| h5. Bootstrap heading | |
| h6. Bootstrap heading |
through classes are also available, for when you want to match the font styling of a heading but cannot use the associated HTML element.
h1. Bootstrap heading
h2. Bootstrap heading
h3. Bootstrap heading
h4. Bootstrap heading
h5. Bootstrap heading
h6. Bootstrap heading
Customizing headings
Use the included utility classes to recreate the small secondary heading text from Bootstrap 3.
Fancy display heading
With faded secondary text
The ScrollSpy plugin is for automatically updating nav targets based on scroll position. Scroll the area below the navbar and watch the active class change. The dropdown sub items will be highlighted as well.
Toggle navigation
@fat
Ad leggings keytar, brunch id art party dolor labore. Pitchfork yr enim lo-fi before they sold out qui. Tumblr farm-to-table bicycle rights whatever. Anim keffiyeh carles cardigan. Velit seitan mcsweeney’s photo booth 3 wolf moon irure. Cosby sweater lomo jean shorts, williamsburg hoodie minim qui you probably haven’t heard of them et cardigan trust fund culpa biodiesel wes anderson aesthetic. Nihil tattooed accusamus, cred irony biodiesel keffiyeh artisan ullamco consequat.
@mdo
Veniam marfa mustache skateboard, adipisicing fugiat velit pitchfork beard. Freegan beard aliqua cupidatat mcsweeney’s vero. Cupidatat four loko nisi, ea helvetica nulla carles. Tattooed cosby sweater food truck, mcsweeney’s quis non freegan vinyl. Lo-fi wes anderson +1 sartorial. Carles non aesthetic exercitation quis gentrify. Brooklyn adipisicing craft beer vice keytar deserunt.
one
Occaecat commodo aliqua delectus. Fap craft beer deserunt skateboard ea. Lomo bicycle rights adipisicing banh mi, velit ea sunt next level locavore single-origin coffee in magna veniam. High life id vinyl, echo park consequat quis aliquip banh mi pitchfork. Vero VHS est adipisicing. Consectetur nisi DIY minim messenger bag. Cred ex in, sustainable delectus consectetur fanny pack iphone.
two
In incididunt echo park, officia deserunt mcsweeney’s proident master cleanse thundercats sapiente veniam. Excepteur VHS elit, proident shoreditch +1 biodiesel laborum craft beer. Single-origin coffee wayfarers irure four loko, cupidatat terry richardson master cleanse. Assumenda you probably haven’t heard of them art party fanny pack, tattooed nulla cardigan tempor ad. Proident wolf nesciunt sartorial keffiyeh eu banh mi sustainable. Elit wolf voluptate, lo-fi ea portland before they sold out four loko. Locavore enim nostrud mlkshk brooklyn nesciunt.
three
Ad leggings keytar, brunch id art party dolor labore. Pitchfork yr enim lo-fi before they sold out qui. Tumblr farm-to-table bicycle rights whatever. Anim keffiyeh carles cardigan. Velit seitan mcsweeney’s photo booth 3 wolf moon irure. Cosby sweater lomo jean shorts, williamsburg hoodie minim qui you probably haven’t heard of them et cardigan trust fund culpa biodiesel wes anderson aesthetic. Nihil tattooed accusamus, cred irony biodiesel keffiyeh artisan ullamco consequat.
Keytar twee blog, culpa messenger bag marfa whatever delectus food truck. Sapiente synth id assumenda. Locavore sed helvetica cliche irony, thundercats you probably haven’t heard of them consequat hoodie gluten-free lo-fi fap aliquip. Labore elit placeat before they sold out, terry richardson proident brunch nesciunt quis cosby sweater pariatur keffiyeh ut helvetica artisan. Cardigan craft beer seitan readymade velit. VHS chambray laboris tempor veniam. Anim mollit minim commodo ullamco thundercats.
Reordering
Order classes
Use classes for controlling the visual order of your content. These classes are responsive, so you can set the by breakpoint (e.g., ). Includes support for through across all five grid tiers.
First, but unordered
Second, but last
Third, but first
There are also responsive and classes that change the of an element by applying and (), respectively. These classes can also be intermixed with the numbered classes as needed.
First, but last
Second, but unordered
Third, but first
Offsetting columns
You can offset grid columns in two ways: our responsive grid classes and our margin utilities. Grid classes are sized to match columns while margins are more useful for quick layouts where the width of the offset is variable.
Offset classes
Move columns to the right using classes. These classes increase the left margin of a column by columns. For example, moves over four columns.
.col-md-4
.col-md-4 .offset-md-4
.col-md-3 .offset-md-3
.col-md-3 .offset-md-3
.col-md-6 .offset-md-3
In addition to column clearing at responsive breakpoints, you may need to reset offsets. See this in action in the grid example.
.col-sm-5 .col-md-6
.col-sm-5 .offset-sm-2 .col-md-6 .offset-md-0
.col-sm-6 .col-md-5 .col-lg-6
.col-sm-6 .col-md-5 .offset-md-2 .col-lg-6 .offset-lg-0
Margin utilities
With the move to flexbox in v4, you can use margin utilities like to force sibling columns away from one another.
.col-md-4
.col-md-4 .ml-auto
.col-md-3 .ml-md-auto
.col-md-3 .ml-md-auto
.col-auto .mr-auto
.col-auto
Auto-layout columns
Utilize breakpoint-specific column classes for easy column sizing without an explicit numbered class like .
Equal-width
For example, here are two grid layouts that apply to every device and viewport, from to . Add any number of unit-less classes for each breakpoint you need and every column will be the same width.
1 of 2
2 of 2
1 of 3
2 of 3
3 of 3
Equal-width columns can be broken into multiple lines, but there was a that prevented this from working without an explicit or . There are workarounds for older browser versions, but they shouldn’t be necessary if you’re up-to-date.
Column
Column
Column
Column
Setting one column width
Auto-layout for flexbox grid columns also means you can set the width of one column and have the sibling columns automatically resize around it. You may use predefined grid classes (as shown below), grid mixins, or inline widths. Note that the other columns will resize no matter the width of the center column.
1 of 3
2 of 3 (wider)
3 of 3
1 of 3
2 of 3 (wider)
3 of 3
Variable width content
Use classes to size columns based on the natural width of their content.
1 of 3
Variable width content
3 of 3
1 of 3
Variable width content
3 of 3
Equal-width multi-row
Create equal-width columns that span multiple rows by inserting a where you want the columns to break to a new line. Make the breaks responsive by mixing the with some responsive display utilities.
col
col
col
col
С чего начать изучение Bootstrap?
Первое, что нам необходимо — это скачать фреймворк и подключить его к странице. Как это выполнить детально описано в статье «Установка платформы Bootstrap».
После того как мы это сделаем обычно возникает следующий вопрос: «А что дальше? Как использовать Bootstrap?». На самом деле тут нет ничего сложного, создавать страницы с использованием Bootstrap очень просто.
Но для этого, нам необходимо сначала ещё изучить сетку и научиться её использовать для создания макетов страниц и разметки блоков. Почитать про неё можно тут (для тех, кто использует Bootstrap 3) или здесь (для Bootstrap 4).
Сетка в версии построена на , а в – на flexbox.
Затем нужно изучить компоненты и классы Bootstrap.
После изучение этих базовых вещей уже можно будет переходить к вёрстке сайта или веб-приложения.
Ну если ваша задача не просто использовать Bootstrap, а что-то в нём изменять, переделывать, то без хороших знаний CSS тут конечно уже не обойтись. Некоторые вещи, конечно, можно настроить через изменения SCSS переменных и применения миксинов, а другие – нет. И это касается любых фреймворков.
I. Начало работы
глава первая
Подключение и настройка
-
Что такое Bootstrap и зачем он нужен?
-
Подключение к сайту
-
Сборка проекта с помощью Gulp (Bootstrap 4)
-
Пользовательская сборка платформы (Bootstrap 3)
-
Настройка платформы с помощью переменных LESS (Bootstrap 3)
-
Варианты установки, сборка с помощью Grunt (Bootstrap 3)
-
Инструмент Bootlint (Средство для проверки бутстраповских страниц на корректность)
глава вторая
Создание макета
- Адаптивный дизайн сайта. Что это и как его создать?
- Элементы сетки и как их использовать для создания макета
- Сетка (Bootstrap 3)
-
Изменение порядка следования адаптивных блоков в макете
(Bootstrap 3) - Сетка (Bootstrap 4)
- Основы создания адаптивно-фиксированного макета сайта
-
Создание адаптивно-резинового макета
- Media object (медиа-объект)
- Как создать фиксированный макет шириной 960px?
Видео как пользоваться Ускорителем Компьютера?
Examples
Alerts are available for any length of text, as well as an optional dismiss button. For proper styling, use one of the eight required contextual classes (e.g., ). For inline dismissal, use the .
A simple primary alert—check it out!
A simple secondary alert—check it out!
A simple success alert—check it out!
A simple danger alert—check it out!
A simple warning alert—check it out!
A simple info alert—check it out!
A simple light alert—check it out!
A simple dark alert—check it out!
Conveying meaning to assistive technologies
Using color to add meaning only provides a visual indication, which will not be conveyed to users of assistive technologies – such as screen readers. Ensure that information denoted by the color is either obvious from the content itself (e.g. the visible text), or is included through alternative means, such as additional text hidden with the class.
Link color
Use the utility class to quickly provide matching colored links within any alert.
A simple primary alert with . Give it a click if you like.
A simple secondary alert with . Give it a click if you like.
A simple success alert with . Give it a click if you like.
A simple danger alert with . Give it a click if you like.
A simple warning alert with . Give it a click if you like.
A simple info alert with . Give it a click if you like.
A simple light alert with . Give it a click if you like.
A simple dark alert with . Give it a click if you like.
Additional content
Alerts can also contain additional HTML elements like headings, paragraphs and dividers.
Well done!
Aww yeah, you successfully read this important alert message. This example text is going to run a bit longer so that you can see how spacing within an alert works with this kind of content.
Whenever you need to, be sure to use margin utilities to keep things nice and tidy.
Dismissing
Using the alert JavaScript plugin, it’s possible to dismiss any alert inline. Here’s how:
- Be sure you’ve loaded the alert plugin, or the compiled Bootstrap JavaScript.
- If you’re building our JavaScript from source, it . The compiled version includes this.
- Add a dismiss button and the class, which adds extra padding to the right of the alert and positions the button.
- On the dismiss button, add the attribute, which triggers the JavaScript functionality. Be sure to use the element with it for proper behavior across all devices.
- To animate alerts when dismissing them, be sure to add the and classes.
You can see this in action with a live demo:
Holy guacamole! You should check in on some of those fields below.
×
Z-index
Several Bootstrap components utilize , the CSS property that helps control layout by providing a third axis to arrange content. We utilize a default z-index scale in Bootstrap that’s been designed to properly layer navigation, tooltips and popovers, modals, and more.
These higher values start at an arbitrary number, high and specific enough to ideally avoid conflicts. We need a standard set of these across our layered components—tooltips, popovers, navbars, dropdowns, modals—so we can be reasonably consistent in the behaviors. There’s no reason we couldn’t have used + or +.
We don’t encourage customization of these individual values; should you change one, you likely need to change them all.
To handle overlapping borders within components (e.g., buttons and inputs in input groups), we use low single digit values of , , and for default, hover, and active states. On hover/focus/active, we bring a particular element to the forefront with a higher value to show their border over the sibling elements.
Community
Stay up to date on the development of Bootstrap and reach out to the community with these helpful resources.
- Follow @getbootstrap on Twitter.
- Read and subscribe to The Official Bootstrap Blog.
- Join the official Slack room.
- Chat with fellow Bootstrappers in IRC. On the server, in the channel.
- Implementation help may be found at Stack Overflow (tagged ).
- Developers should use the keyword on packages which modify or add to the functionality of Bootstrap when distributing through npm or similar delivery mechanisms for maximum discoverability.
You can also follow @getbootstrap on Twitter for the latest gossip and awesome music videos.
Как получить и вернуть средства?
Horizontal
Add to change the layout of list group items from vertical to horizontal across all breakpoints. Alternatively, choose a responsive variant to make a list group horizontal starting at that breakpoint’s . Currently horizontal list groups cannot be combined with flush list groups.
ProTip: Want equal-width list group items when horizontal? Add to each list group item.
- Cras justo odio
- Dapibus ac facilisis in
- Morbi leo risus
- Cras justo odio
- Dapibus ac facilisis in
- Morbi leo risus
- Cras justo odio
- Dapibus ac facilisis in
- Morbi leo risus
- Cras justo odio
- Dapibus ac facilisis in
- Morbi leo risus
- Cras justo odio
- Dapibus ac facilisis in
- Morbi leo risus
Горизонтальная форма
Вы можете использовать классы сетки Bootstrap для создания горизонтальных форм. Просто укажите, сколько колонок должен занимать каждый элемент. В частности, добавьте класс .row к .form-group и класс .col-*-* или .col-* для каждой колонки.
Вы также должны добавить класс .col-form-label к элементу <label>, чтобы метка относительно текстовых полей расположилась по центру вертикали.
<link rel=»stylesheet» href=»https://maxcdn.bootstrapcdn.com/bootstrap/4.0.0/css/bootstrap.min.css»>
<div class=»container»>
<form>
<div class=»form-group row»>
<label for=»first_name» class=»col-xs-3 col-form-label mr-2″>Имя</label>
<div class=»col-xs-9″>
<input type=»text» class=»form-control» id=»first_name» name=»first_name»>
</div>
</div>
<div class=»form-group row»>
<label for=»last_name» class=»col-xs-3 col-form-label mr-2″>Фамилия</label>
<div class=»col-xs-9″>
<input type=»text» class=»form-control» id=»last_name» name=»last_name»>
</div>
</div>
<div class=»form-group row»>
<div class=»offset-xs-3 col-xs-9″>
<button type=»submit» class=»btn btn-primary»>Отправить</button>
</div>
</div>
</form>
</div>
Bootstrap 4 против Bootstrap 3
Когда речь идёт о горизонтальных формах, имеются некоторые незначительные различия между Bootstrap 4 и Bootstrap 3.
Сетки
При использовании сеток для макета формы, Bootstrap 4 требует класс .row. Этот класс не является обязательным для форм Bootstrap 3 (хотя по прежнему обязателен для сеток Bootstrap 3).
Метки
Bootstrap 4 использует .col-form-label в сетке макета формы, тогда как Bootstrap 3 использует .control-label
Обратите внимание, что Bootstrap 4 изначально использовал .form-control-label, но впоследствии заменил его на .col-form-label.
Класс .form-horizontal
Bootstrap 3 требует класс .form-horizontal, тогда как Bootstrap 4 нет.