Visual studio для windows
Содержание:
- Поддерживаемые предложения SQLSupported SQL offerings
- Step 1 — Make sure your computer is ready for Visual Studio
- Список для однодневного похода
- Требования к системе для SSMSSSMS System Requirements
- 5) Установите GetFLV Player
- Совместная работаCollaborate
- Создание проектаCreate a project
- Модульная установкаModular installation
- Шаг 1. Подготовка компьютера к установке Visual StudioStep 1 — Make sure your computer is ready for Visual Studio
- Настройка параметров отладкиConfigure debugging options
- Step 7 — Select the installation location (Optional)
- Агент тестирования Microsoft Visual Studio 2019: требования к системеMicrosoft Visual Studio Test Agent 2019 System Requirements
- Создание приложенияCreate the application
- Popular productivity features
- Как получить доступ к папке
- Понятие «Разрыв раздела»
- SSMS System Requirements
- Из-за чего могут пропасть SMS
- Техническая поддержкаGet support
Поддерживаемые предложения SQLSupported SQL offerings
- Эта версия SSMS работает со всеми поддерживаемыми версиями SQL Server 2008–SQL Server 2019 (15.x)SQL Server 2019 (15.x) и предоставляет превосходную поддержку новейших облачных функций Базы данных SQL Azure и Azure Synapse Analytics.This version of SSMS works with all supported versions of SQL Server 2008 — SQL Server 2019 (15.x)SQL Server 2019 (15.x) and provides the greatest level of support for working with the latest cloud features in Azure SQL Database and Azure Synapse Analytics.
- Кроме того, SSMS 18.x можно установить одновременно с SSMS 17.x, SSMS 16.x или SQL Server 2014 и более ранними версиями.Additionally, SSMS 18.x can be installed side by side with SSMS 17.x, SSMS 16.x, or SQL Server 2014 SSMS and earlier.
- Службы SQL Server Integration Services (SSIS) — среда SSMS версии 17.x и более поздней не поддерживает подключение к устаревшим службам SQL Server Integration Services.SQL Server Integration Services (SSIS) — SSMS version 17.x or later doesn’t support connecting to the legacy SQL Server Integration Services service. Для подключения к более ранней версии служб Integration Services используйте соответствующую версию SSMS.To connect to an earlier version of the legacy Integration Services, use the version of SSMS aligned with the version of SQL Server. Например, используйте SSMS 16.x для подключения к службам SQL Server 2016 Integration Services.For example, use SSMS 16.x to connect to the legacy SQL Server 2016 Integration Services service. Версии SSMS 17.x и SSMS 16.x можно установить параллельно на одном компьютере.SSMS 17.x and SSMS 16.x can be installed side by side on the same computer. Начиная с выпуска SQL Server 2012 база данных каталога SSIS (SSISDB) является рекомендуемым средством для хранения, выполнения и мониторинга пакетов служб Integration Services, а также управления ими.Since the release of SQL Server 2012, the SSIS Catalog database, SSISDB, is the recommended way to store, manage, run, and monitor Integration Services packages. Дополнительные сведения см. в разделе Каталог служб SSIS.For details, see SSIS Catalog.
Step 1 — Make sure your computer is ready for Visual Studio
Before you begin installing Visual Studio:
-
Check the system requirements. These requirements help you know whether your computer supports Visual Studio 2017.
-
Apply the latest Windows updates. These updates ensure that your computer has both the latest security updates and the required system components for Visual Studio.
-
Reboot. The reboot ensures that any pending installs or updates don’t hinder the Visual Studio install.
-
Free up space. Remove unneeded files and applications from your %SystemDrive% by, for example, running the Disk Cleanup app.
-
Check the system requirements. These requirements help you know whether your computer supports Visual Studio 2019.
-
Apply the latest Windows updates. These updates ensure that your computer has both the latest security updates and the required system components for Visual Studio.
-
Reboot. The reboot ensures that any pending installs or updates don’t hinder the Visual Studio install.
-
Free up space. Remove unneeded files and applications from your %SystemDrive% by, for example, running the Disk Cleanup app.
For questions about running previous versions of Visual Studio side by side with Visual Studio 2017, see the .
For questions about running previous versions of Visual Studio side by side with Visual Studio 2019, see the Visual Studio 2019 Platform Targeting and Compatibility page.
Список для однодневного похода
Требования к системе для SSMSSSMS System Requirements
При использовании последнего пакета обновления текущий выпуск SSMS поддерживает следующие 64-разрядные платформы:The current release of SSMS supports the following 64-bit platforms when used with the latest available service pack:
Поддерживаемые операционные системыSupported Operating Systems:
- Windows 10 (64-разрядная) как минимум версии 1607 (10.0.14393)Windows 10 (64-bit) version 1607 (10.0.14393) or later
- Windows 8.1 (64-разрядная)Windows 8.1 (64-bit)
- Windows Server 2019 (64-разрядная версия)Windows Server 2019 (64-bit)
- Windows Server 2016 (64-разрядная версия)Windows Server 2016 (64-bit)
- Windows Server 2012 R2 (64-разрядная версия)Windows Server 2012 R2 (64-bit)
- Windows Server 2012 (64-разрядная версия)Windows Server 2012 (64-bit)
- Windows Server 2008 R2 (64-разрядная версия)Windows Server 2008 R2 (64-bit)
Поддерживаемое оборудование:Supported hardware:
- Процессор x86 (Intel, AMD) с частотой как минимум 1,8 ГГц.1.8 GHz or faster x86 (Intel, AMD) processor. Рекомендуется использовать как минимум двухъядерный процессор.Dual-core or better recommended
- 2 ГБ ОЗУ; рекомендуется 4 ГБ ОЗУ (минимум 2,5 ГБ при выполнении на виртуальной машине)2 GB of RAM; 4 GB of RAM recommended (2.5 GB minimum if running on a virtual machine)
- Доступное место на жестком диске объемом от 2 до 10 ГБHard disk space: Minimum of 2 GB up to 10 GB of available space
Примечание
Решение SSMS доступно только как 32-разрядное приложение для Windows.SSMS is available only as a 32-bit application for Windows. Если вам нужно средство для операционных систем, отличных от Windows, рекомендуем использовать Azure Data Studio.If you need a tool that runs on operating systems other than Windows, we recommend Azure Data Studio. Azure Data Studio — это кроссплатформенное средство для macOS, Linux и Windows.Azure Data Studio is a cross-platform tool that runs on macOS, Linux, as well as Windows. Дополнительные сведения см. в разделе Azure Data Studio.For details, see Azure Data Studio.
5) Установите GetFLV Player
Совместная работаCollaborate
Посмотрите видео ниже, чтобы узнать, как решать проблемы совместно с другими специалистами.View the following video to learn more about how you can team up to solve issues. Длительность видео: 4:22 мин.Video length: 4.22 minutes
Рабочий процесс Git-firstGit-first workflow
Первое, что вы заметите при открытии Visual Studio 2019, — новое окно запуска.Something you’ll notice when you open Visual Studio 2019 is its new start window.
С помощью этого окна запуска можно быстро перейти к коду несколькими способами.The start window presents you with several options to get you to code quickly. Мы включили возможность клонирования или извлечения кода из репозитория.We’ve placed the option to clone or check out code from a repo, first.
Окно запуска также позволяет открыть проект, решение и локальную папку или создать новый проект.The start window also includes options to open a project or solution, open a local folder, or create a new project.
Дополнительные сведения см. в записи блога Приступая к написанию кода: Как мы разработали новое окно запуска Visual Studio.For more information, see the Get to code: How we designed the new Visual Studio start window blog post.
Производительность GitGit productivity
Новое в 16.8 Теперь Git является интерфейсом системы управления версиями по умолчанию в Visual Studio 2019.New in 16.8 Git is now the default version control experience in Visual Studio 2019. Мы разработали набор функций на основе ваших отзывов за два прошлых выпуска.We have built out the feature set and iterated on it based on your feedback during the past two releases. Теперь новый интерфейс включен по умолчанию для всех пользователей.The new experience has now been turned on by default for everyone. В новом меню Git можно клонировать, создавать или открывать репозитории.From the new Git menu, you can clone, create, or open repositories. Используйте интегрированные окна инструментов Git для фиксации и отправки изменений в код, управления ветвями, отслеживания изменений удаленных репозиториев и разрешения конфликтов слияния.Use the integrated Git tool windows to commit and push changes to your code, manage branches, stay up to date with your remote repositories, and resolve merge conflicts.
Дополнительные сведения см. на странице Производительность Git в Visual Studio.For more information, see the Git productivity in Visual Studio page.
Visual Studio Live Share — это служба для разработчиков, которая позволяет предоставить базу кода и соответствующий контекст коллеге и обеспечить двунаправленное взаимодействие непосредственно из среды Visual Studio.Visual Studio Live Share is a developer service that allows you to share a codebase and its context with a teammate and get instant bidirectional collaboration directly from within Visual Studio. Благодаря Live Share коллега может легко и безопасно просматривать, изменять и отлаживать проект, предоставленный вами для общего доступа.With Live Share, a teammate can read, navigate, edit, and debug a project that you’ve shared with them, and do so seamlessly and securely.
В Visual Studio 2019 эта служба устанавливается по умолчанию.And with Visual Studio 2019, this service is installed by default.
Дополнительные сведения см. в разделе Visual Studio Live Share для проверки кода в режиме реального времени и интерактивного обучения записи блога и Live Share, теперь включены с помощью Visual Studio 2019 записи блога.For more information, see the Visual Studio Live Share for real-time code reviews and interactive education blog post and the Live Share now included with Visual Studio 2019 blog post.
Интегрированная проверка кодаIntegrated code reviews
Мы представляем новое расширение, которое можно скачать для использования в Visual Studio 2019.We’re introducing a new extension that you can download to use with Visual Studio 2019. С помощью этого нового расширения можно просматривать, запускать и даже выполнять отладку запросов на вытягивание, не выходя из Visual Studio.With this new extension, you can review, run, and even debug pull requests from your team without leaving Visual Studio. Мы включили поддержку кода в репозиториях GitHub и DevOps в Azure.We support code in both GitHub and Azure DevOps repositories.
Дополнительные сведения см. в записи блога Проверка кода с помощью расширения для запросов на вытягивание в Visual Studio.For more information, see the Code reviews using the Visual Studio Pull Requests extension blog post.
Создание проектаCreate a project
Сначала создадим новый проект приложения для универсальной платформы Windows.First, create a Universal Windows Platform project. Для этого типа проекта уже имеются все нужные файлы шаблонов, что избавляет вас от лишней работы.The project type comes with all the template files you need, before you’ve even added anything!
-
Запустите Visual Studio.Open Visual Studio.
-
В верхней строке меню последовательно выберите Файл > Создать > Проект.From the top menu bar, choose File > New > Project.
-
В левой панели диалогового окна Новый проект разверните узел Visual C# и выберите Универсальные приложения.In the left pane of the New Project dialog box, expand Visual C#, and then choose Windows Universal. В средней панели выберите Пустое приложение (универсальное приложение Windows) .In the middle pane, choose Blank App (Universal Windows). Назовите проект HelloWorld и нажмите OK.Then, name the project HelloWorld and choose OK.
Примечание
Убедитесь, что исходный проект находится на отформатированном диске NTFS, например на диске операционной системы (ОС).Make sure that the location of the source project is on a New Technology File System (NTFS) formatted drive, such as your Operating System (OS) drive. В противном случае могут возникнуть проблемы при сборке и выполнении проекта.Otherwise, you might have trouble building and running your project.
Примечание
Если шаблон проекта Пустое приложение (универсальное приложение Windows) отсутствует, щелкните ссылку Открыть установщик Visual Studio в левой области диалогового окна Новый проект.If you don’t see the Blank App (Universal Windows) project template, click the Open Visual Studio Installer link in the left pane of the New Project dialog box.Запускается Visual Studio Installer.The Visual Studio Installer launches. Выберите рабочую нагрузку Разработка приложений для универсальной платформы Windows и выберите Изменить.Choose the Universal Windows Platform development workload, and then choose Modify.
-
Подтвердите значения по умолчанию для параметров Целевая версия и Минимальная версия в диалоговом окне Новый проект приложения для универсальной платформы Windows.Accept the default Target version and Minimum version settings in the New Universal Windows Platform Project dialog box.
-
Откройте Visual Studio и в начальном окне выберите Создать проект.Open Visual Studio, and on the start window, choose Create a new project.
-
На экране Создание проекта введите в поле поиска Универсальная платформа Windows, выберите шаблон C# Пустое приложение (универсальная платформа Windows) и щелкните Далее.On the Create a new project screen, enter Universal Windows in the search box, choose the C# template for Blank App (Universal Windows), and then choose Next.
Примечание
Если вы не видите здесь шаблон Пустое приложение (универсальное приложение Windows) , щелкните ссылку Установка других средств и компонентов.If you don’t see the Blank App (Universal Windows) project template, click the Install more tools and features link.Запускается Visual Studio Installer.The Visual Studio Installer launches. Выберите рабочую нагрузку Разработка приложений для универсальной платформы Windows и выберите Изменить.Choose the Universal Windows Platform development workload, and then choose Modify.
-
Присвойте проекту имя HelloWorld и нажмите кнопку Создать.Give the project a name, HelloWorld, and choose Create.
-
Подтвердите значения по умолчанию для параметров Целевая версия и Минимальная версия в диалоговом окне Новый проект приложения для универсальной платформы Windows.Accept the default Target version and Minimum version settings in the New Universal Windows Platform Project dialog box.
Примечание
При первом использовании Visual Studio для создания приложения UWP появится диалоговое окно Параметры.If this is the first time you have used Visual Studio to create a UWP app, a Settings dialog box might appear. Выберите Режим разработчика, затем нажмите Да.Choose Developer mode, and then choose Yes.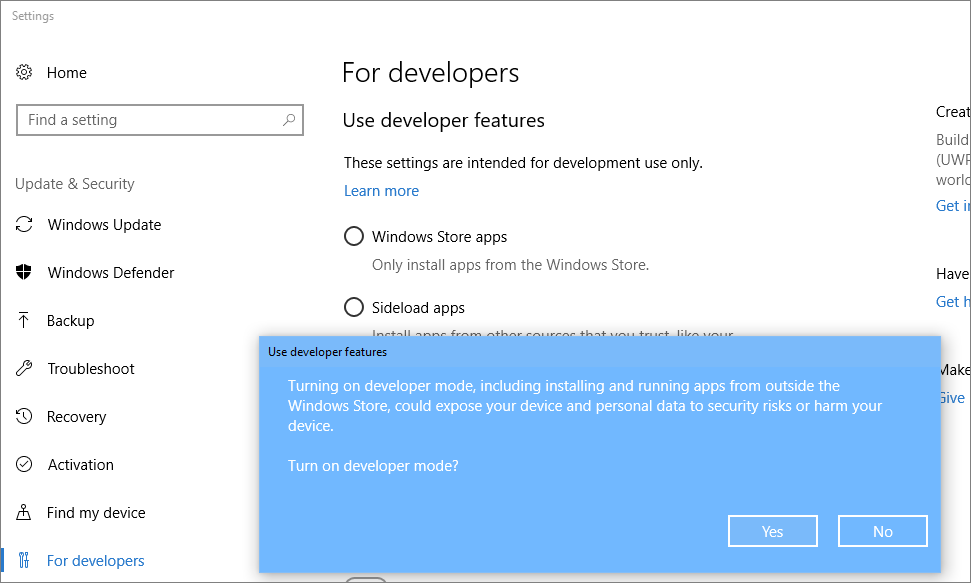 Visual Studio установит дополнительный пакет режима разработчика.Visual Studio installs an additional Developer Mode package for you. После завершения установки пакета закройте диалоговое окно Параметры.When the package installation is complete, close the Settings dialog box.
Модульная установкаModular installation
Модульный установщик Visual Studio позволяет выбрать и установить рабочие нагрузки.Visual Studio’s modular installer enables you to choose and install workloads. Рабочие нагрузки — это группы функций, необходимых для языка программирования или платформы, которую вы предпочитаете.Workloads are groups of features needed for the programming language or platform you prefer. Этот подход обеспечивает меньший объем установки Visual Studio, а также более быструю установку и обновление среды.This strategy helps to keep the footprint of the Visual Studio installation smaller, which means it installs and updates faster too.
Установите Visual Studio бесплатно со страницы скачиваемых материалов Visual Studio, если еще не сделали этого.If you haven’t already installed Visual Studio, go to the Visual Studio downloads page to install it for free.
Установите Visual Studio бесплатно со страницы скачиваемых материалов Visual Studio, если еще не сделали этого.If you haven’t already installed Visual Studio, go to the Visual Studio downloads page to install it for free.
Дополнительные сведения о настройке Visual Studio в своей системе см. в статье Установка версии-кандидата Visual Studio.To learn more about setting up Visual Studio on your system, see Install Visual Studio.
Шаг 1. Подготовка компьютера к установке Visual StudioStep 1 — Make sure your computer is ready for Visual Studio
Перед началом установки Visual Studio:Before you begin installing Visual Studio:
-
Проверьте требования к системе.Check the system requirements. Так вы узнаете, поддерживает ли ваш компьютер Visual Studio 2017.These requirements help you know whether your computer supports Visual Studio 2017.
-
Примените актуальные обновления Windows.Apply the latest Windows updates. Эти обновления гарантируют, что на компьютере установлены последние обновления для системы безопасности и необходимые системные компоненты для Visual Studio.These updates ensure that your computer has both the latest security updates and the required system components for Visual Studio.
-
Перезагрузите систему.Reboot. Перезагрузка гарантирует, что ожидающие установки или обновления компоненты не будут препятствовать установке Visual Studio.The reboot ensures that any pending installs or updates don’t hinder the Visual Studio install.
-
Освободите место.Free up space. Удалите ненужные файлы и приложения с системного диска. Например, запустите приложение очистки диска.Remove unneeded files and applications from your %SystemDrive% by, for example, running the Disk Cleanup app.
-
Проверьте требования к системе.Check the system requirements. Так вы узнаете, поддерживает ли ваш компьютер Visual Studio 2019.These requirements help you know whether your computer supports Visual Studio 2019.
-
Примените актуальные обновления Windows.Apply the latest Windows updates. Эти обновления гарантируют, что на компьютере установлены последние обновления для системы безопасности и необходимые системные компоненты для Visual Studio.These updates ensure that your computer has both the latest security updates and the required system components for Visual Studio.
-
Перезагрузите систему.Reboot. Перезагрузка гарантирует, что ожидающие установки или обновления компоненты не будут препятствовать установке Visual Studio.The reboot ensures that any pending installs or updates don’t hinder the Visual Studio install.
-
Освободите место.Free up space. Удалите ненужные файлы и приложения с системного диска. Например, запустите приложение очистки диска.Remove unneeded files and applications from your %SystemDrive% by, for example, running the Disk Cleanup app.
Сведения об использовании предыдущих версий Visual Studio параллельно с Visual Studio 2017 см. в разделе .For questions about running previous versions of Visual Studio side by side with Visual Studio 2017, see the .
Сведения об использовании предыдущих версий Visual Studio параллельно с Visual Studio 2019 см. в разделе Целевая платформа и совместимость для Visual Studio 2019.For questions about running previous versions of Visual Studio side by side with Visual Studio 2019, see the Visual Studio 2019 Platform Targeting and Compatibility page.
Настройка параметров отладкиConfigure debugging options
Если вы часто сталкиваетесь с нехваткой памяти во время сеансов отладки, можно оптимизировать производительность, внеся одно или несколько изменений в конфигурацию.If you are typically running low on memory during debugging sessions, you can optimize performance by making one or more configuration changes.
-
Включение функции «Только мой код»Enable Just My Code
Простейшая оптимизация заключается в том, чтобы включить функцию Только мой код, которая загружает только символы для проекта.The simplest optimization is to enable the Just My Code feature, which only loads symbols for your project. Включение этой функции может привести к значительной экономии памяти при отладке управляемых приложений (.NET).Enabling this feature can result in a significant memory saving for debugging managed applications (.NET). Для некоторых типов проектов этот параметр уже включен по умолчанию.This option is already enabled by default in some project types.
Чтобы включить функцию Только мой код, выберите Сервис > Параметры > Отладка > Общие и затем Включить только мой код.To enable Just My Code, choose Tools > Options > Debugging > General, and then select Enable Just My Code.
-
Указание символов для загрузкиSpecify symbols to load
При отладке машинного кода для загрузки файлов символов ( .pdb) требуется большой объем памяти.For native debugging, loading symbol files (.pdb) is expensive in terms of memory resources. Вы можете настроить параметры отладочных символов для экономии памяти.You can configure your debugger symbol settings to conserve memory. Как правило, решение настраивается для загрузки только модулей из проекта.Typically, you configure the solution to only load modules from your project.
Чтобы указать загрузку символов, выберите Сервис > Параметры > Отладка > Символы.To specify symbol loading, choose Tools > Options > Debugging > Symbols.
Задайте параметр Только указанные модули вместо Все модули и затем укажите, какие модули нужно загружать.Set the options to Only specified modules instead of All modules and then specify which modules you care to load. Во время отладки также можно щелкнуть определенные модули правой кнопкой мыши в окне Модули, чтобы явно включить модуль в загрузку символов.While debugging, you can also right-click specific modules in the Modules window to explicitly include a module in the symbol load. (Чтобы открыть окно во время отладки, выберите Отладка > Окна > Модули.)(To open the window while debugging, choose Debug > Windows > Modules.)
Дополнительные сведения см. в разделе Общие сведения о файлах символов.For more information, see Understand symbol files.
-
Отключение средств диагностикиDisable Diagnostic Tools
Рекомендуется отключить профилирование ЦП после использования.It is recommended that you disable CPU profiling after use. Эта функция может потреблять очень много ресурсов.This feature can consume large amounts of resources. После включения профилирования ЦП это состояние распространяется и на все последующие сеансы отладки, поэтому его следует отключать явным образом.Once CPU profiling is enabled, this state is persisted across subsequent debug sessions, so it’s worth explicitly turning it off when done. Вы можете сэкономить ресурсы, отключив средства диагностики при отладке, если некоторые предоставляемые функции вам не нужны.You may save some resources by disabling the diagnostic tools while debugging if you do not need the provided features.
Чтобы отключить средства диагностики, запустите сеанс отладки, выберите Сервис > Параметры > Включить средства диагностики и отмените выбор соответствующего параметра.To disable the Diagnostic Tools, start a debugging session, choose Tools > Options > Enable Diagnostic Tools, and deselect the option.
Дополнительные сведения см. в статье Средства профилирования.For more information, see Profiling Tools.
Step 7 — Select the installation location (Optional)
New in 15.7: You can now reduce the installation footprint of Visual Studio on your system drive. You can choose to move the download cache, shared components, SDKs, and tools to different drives, and keep Visual Studio on the drive that runs it the fastest.
You can reduce the installation footprint of Visual Studio on your system drive. You can choose to move the download cache, shared components, SDKs, and tools to different drives, and keep Visual Studio on the drive that runs it the fastest.
Important
You can select a different drive only when you first install Visual Studio. If you’ve already installed it and want to change drives, you must uninstall Visual Studio and then reinstall it.
For more information, see the Select installation locations page.
Агент тестирования Microsoft Visual Studio 2019: требования к системеMicrosoft Visual Studio Test Agent 2019 System Requirements
Агент тестирования Visual Studio поддерживает те же требования к системе, что и Visual Studio, со следующими изменениями.Visual Studio Test Agent supports the same system requirements as Visual Studio with the following changes:
- Требуется процессор с тактовой частотой не ниже 2,6 ГГцRequires a 2.6 GHz or faster processor. Рекомендуется использовать как минимум четырехъядерный процессор.Quad core or better recommended
- Требуется 4 ГБ ОЗУ или больше для создания нагрузкиRequires 4 GB of RAM or higher for load generation
- Требуется 10 ГБ пространства на жестком дискеRequires 10 GB of hard disk space
Создание приложенияCreate the application
Теперь можно приступить к разработке.It’s time to start developing. Мы добавим элемент управления »Кнопка», назначим кнопке действие и затем запустим приложение «Hello World», чтобы посмотреть, как оно выглядит.You’ll add a button control, add an action to the button, and then start the «Hello World» app to see what it looks like.
-
В Обозревателе решений дважды щелкните на файле MainPage.xaml, чтобы открыть разделенное представление.In the Solution Explorer, double-click MainPage.xaml to open a split view.
Откроется две панели: Конструктор XAML, содержащий холст конструктора, и редактор XAML, в котором можно добавлять и изменять код.There are two panes: The XAML Designer, which includes a design canvas, and the XAML Editor, where you can add or change code.
-
Щелкните Панель элементов, чтобы открыть всплывающее окно «Панель элементов».Choose Toolbox to open the Toolbox fly-out window.
(Если параметр Панель элементов отсутствует, его можно открыть в строке меню.(If you don’t see the Toolbox option, you can open it from the menu bar. Для этого выберите Вид > Панель инструментов.To do so, choose View > Toolbar. Либо нажмите клавиши CTRL+ALT+X.)Or, press Ctrl+Alt+X.)
-
Щелкните значок Закрепить, чтобы закрепить окно «Панель элементов».Click the Pin icon to dock the Toolbox window.
-
Щелкните элемент управления Кнопка и перетащите его на холст конструктора.Click the Button control and then drag it onto the design canvas.
Если посмотреть на код в редакторе XAML, мы увидим, что кнопка была также добавлена туда:If you look at the code in the XAML Editor, you’ll see that the Button has been added there, too:
В редакторе XAML измените значение параметра Content кнопки с «Button» на «Hello World!».In the XAML Editor, change Button Content value from «Button» to «Hello World!»
Обратите внимание, что кнопка в Конструкторе XAML также изменится.Notice that the button in the XAML Designer changes, too.
Добавление обработчика событийAdd an event handler
Название «обработчик событий» звучит как что-то сложное, но это всего лишь еще одно имя в коде, которое вызывается, когда происходит какое-то событие.An «event handler» sounds complicated, but it’s just another name for code that is called when an event happens. В нашем случае он добавляет действие к кнопке «Hello World!».In this case, it adds an action to the «Hello World!» .button.
-
Дважды щелкните элемент управления «Кнопка» на холсте конструктора.Double-click the button control on the design canvas.
-
Измените код обработчика событий в файле MainPage.xaml.cs, страница с выделенным кодом.Edit the event handler code in MainPage.xaml.cs, the code-behind page.
Здесь начинается самое интересное.Here is where things get interesting. Обработчик события по умолчанию выглядит так:The default event handler looks like this:
Давайте изменим его, чтобы он выглядел следующим образом:Let’s change it, so it looks like this:
Ниже приведен код для копирования и вставки:Here’s the code to copy and paste:
Что же мы только что сделали?What did we just do?
Этот код использует некоторые функции API Windows для создания объекта синтеза речи и передает ему некоторый текст для озвучивания.The code uses some Windows APIs to create a speech synthesis object and then gives it some text to say. (Дополнительные сведения об использовании см. в статье System.Speech.Synthesis.)(For more information on using , see System.Speech.Synthesis.)
Popular productivity features
Some of the popular features in Visual Studio that help you to be more productive as you develop software include:
Squiggles and Quick Actions
Squiggles are wavy underlines that alert you to errors or potential problems in your code as you type. These visual clues enable you to fix problems immediately without waiting for the error to be discovered during build or when you run the program. If you hover over a squiggle, you see additional information about the error. A light bulb may also appear in the left margin with actions, known as Quick Actions, to fix the error.
-
Refactoring includes operations such as intelligent renaming of variables, extracting one or more lines of code into a new method, changing the order of method parameters, and more.
-
IntelliSense is a term for a set of features that displays information about your code directly in the editor and, in some cases, write small bits of code for you. It’s like having basic documentation inline in the editor, which saves you from having to look up type information elsewhere. IntelliSense features vary by language. For more information, see C# IntelliSense, Visual C++ IntelliSense, JavaScript IntelliSense, and Visual Basic IntelliSense. The following illustration shows how IntelliSense displays a member list for a type:
-
Visual Studio can seem overwhelming at times with so many menus, options, and properties. Visual Studio search (Ctrl+Q) is a great way to rapidly find IDE features and code in one place.
For more information, see Quick Launch.
For information and productivity tips, see How to use Visual Studio search.
-
Collaboratively edit and debug with others in real time, regardless of what your app type or programming language. You can instantly and securely share your project and, as needed, debugging sessions, terminal instances, localhost web apps, voice calls, and more.
-
The Call Hierarchy window shows the methods that call a selected method. This can be useful information when you’re thinking about changing or removing the method, or when you’re trying to track down a bug.
-
CodeLens helps you find references to your code, changes to your code, linked bugs, work items, code reviews, and unit tests, all without leaving the editor.
-
The Go To Definition feature takes you directly to the location where a function or type is defined.
-
The Peek Definition window shows the definition of a method or type without actually opening a separate file.
Как получить доступ к папке
Понятие «Разрыв раздела»
Какие свойства имеет документ? Это:
- Границы печатного поля
- Колонтитул (это мы выяснили на уроке 38)
- Ориентация страницы (книжная или альбомная)
- Набор стилей текста
Я не упоминаю такие свойства, как автор документа, количество знаков, страниц и так далее.
По ходу создания документа мы можем создавать новые стили текста (разумеется, не увлекаясь), но вот границы печатного поля, ориентация страницы и колонтитулы задаются на ВЕСЬ документ.
А как быть, если необходима страница в альбомном варианте, например, в документе есть большая таблица, которая отлично будет читаться именно в альбомном варианте:
Для этого есть возможность создания в документе несколько разделов.
Команда «Разрыв раздела» находится на ленте Разметка страницы → группа команд Параметры страницы → команда Разрывы → выпадающее меню → второй раздел выпадающего меню Разрывы разделов → 4 вида разделов:
- Следующая страница
- Текущая страница
- Четная страница
- Нечетная страница
Рассмотрим подробнее виды разрывов разделов:
SSMS System Requirements
The current release of SSMS supports the following 64-bit platforms when used with the latest available service pack:
Supported Operating Systems:
- Windows 10 (64-bit) version 1607 (10.0.14393) or later
- Windows 8.1 (64-bit)
- Windows Server 2019 (64-bit)
- Windows Server 2016 (64-bit)
- Windows Server 2012 R2 (64-bit)
- Windows Server 2012 (64-bit)
- Windows Server 2008 R2 (64-bit)
Supported hardware:
- 1.8 GHz or faster x86 (Intel, AMD) processor. Dual-core or better recommended
- 2 GB of RAM; 4 GB of RAM recommended (2.5 GB minimum if running on a virtual machine)
- Hard disk space: Minimum of 2 GB up to 10 GB of available space
Note
SSMS is available only as a 32-bit application for Windows. If you need a tool that runs on operating systems other than Windows, we recommend Azure Data Studio. Azure Data Studio is a cross-platform tool that runs on macOS, Linux, as well as Windows. For details, see Azure Data Studio.
Из-за чего могут пропасть SMS
Техническая поддержкаGet support
Иногда возникают проблемы.Sometimes, things can go wrong. Если установить Visual Studio не удается, воспользуйтесь пошаговыми указаниями в статье Устранение неполадок при установке и обновлении Visual Studio.If your Visual Studio installation fails, see Troubleshoot Visual Studio installation and upgrade issues for step-by-step guidance.
Также доступен , предназначенный для оказания помощи при проблемах с установкой (только на английском языке).We also offer an (English only) support option for installation-related issues.
Ниже приведены несколько дополнительных вариантов:Here are a few more support options:
- Вы можете сообщить о проблемах с продуктом, используя средство Сообщить о проблеме. Оно доступно как в Visual Studio Installer, так и в IDE Visual Studio.Report product issues to us via the Report a Problem tool that appears both in the Visual Studio Installer and in the Visual Studio IDE.
- Вы можете предлагать новые функции, просматривать описания проблем и искать решения в сообществе разработчиков Visual Studio.Suggest a feature, track product issues, and find answers in the Visual Studio Developer Community.
- Вы также можете связаться с нами и другими разработчиками Visual Studio, используя свою учетную запись GitHub в обсуждении Visual Studio в сообществе Gitter.Use your GitHub account to talk to us and other Visual Studio developers in the Visual Studio conversation in the Gitter community.