Картинка или видео по размеру экрана на css
Содержание:
- Images
- Управление позицией фонового изображения
- Different Images for Different Devices
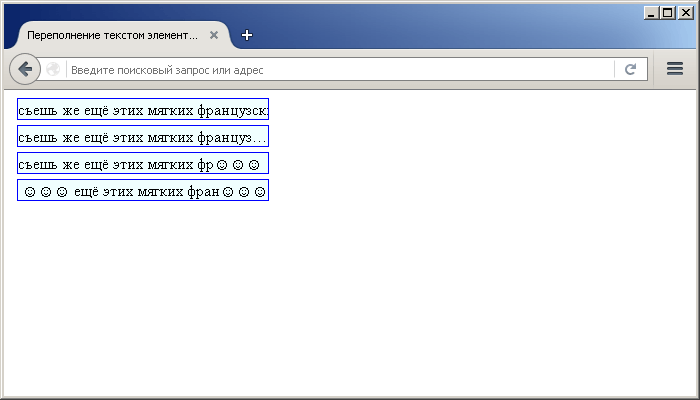
- Как автоматически писать “продолжение таблицы” на новой странице?
- More
- CSS Advanced
- Тень от изображения.
- More
- Оставить ответ
- More Examples
- More
- More
- Images
- CSS Properties
- Images
- More
- CSS Filters
- Комментарии
- Images
- Image Modal (Advanced)
- Transparency using RGBA
- CSS Tutorial
Images
SlideshowSlideshow GalleryModal ImagesLightboxResponsive Image GridImage GridTab GalleryImage Overlay FadeImage Overlay SlideImage Overlay ZoomImage Overlay TitleImage Overlay IconImage EffectsBlack and White ImageImage TextImage Text BlocksTransparent Image TextFull Page ImageForm on ImageHero ImageBlur Background ImageChange Bg on ScrollSide-by-Side ImagesRounded ImagesAvatar ImagesResponsive ImagesCenter ImagesThumbnailsBorder Around ImageMeet the TeamSticky ImageFlip an ImageShake an ImagePortfolio GalleryPortfolio with FilteringImage ZoomImage Magnifier GlassImage Comparison Slider
Управление позицией фонового изображения
По умолчанию, фоновое изображение позиционируется в верхнем левом углу элемента, используя CSS свойство background-position мы можем изменить это положение с использованием единиц измерения CSS, либо используя ключевые слова:
| Значение | Описание |
|---|---|
| left topleft centerleft bottomright topright centerright bottomcenter topcenter centercenter bottom | Задает положение изображения. Первое значение-горизонтальное положение, а второе значение вертикальное. Если вы указываете только одно ключевое слово, другое значение будет «center» |
| x% y% | Задает положение изображения. Первое значение — горизонтальное положение, а второе значение вертикальное. Левый верхний угол имеет 0% 0% (это значение по умолчанию). В правом нижнем углу 100% 100%. Если указано только одно значение, то другое значение будет 50%. |
| x y | Задает положение изображения. Первое значение — горизонтальное положение, а второе значение вертикальное. Левый верхний угол имеет 0 0. Значения могут быть в пикселях, или других единицах измерения CSS. Если указано только одно значение, то другое значение будет 50%. Вы можете совместно использовать проценты и единицы измерения. |
Рассмотрим пример использования этого свойства:
<!DOCTYPE html>
<html>
<head>
	<title>Пример позиционирования фонового изображения</title>
<style>
div {
display: inline-block; /* устанавливаем, что элементы становятся блочно-строчными (чтобы выстроились в линейку) */
background-image: url("smile_bg.png"); /* указываем путь к файлу изображения, которое будет использоваться как задний фон */
background-repeat: no-repeat; /**/
width: 100px; /* устанавливаем ширину элемента */
height: 100px; /* устанавливаем высоту элемента */
border: 1px solid; /* устанваливаем сплошную границу размером 1 пиксель */
margin: 10px; /* устанавливаем внешние отступы со всех сторон */
text-align: center; /* выравниваем текст по центру */
line-height: 60px; /* указываем высоту строки */
background-color: azure; /* задаем цвет заднего фона */
}
.leftTop {background-position: left top;} /* задаем позицию ключевыми словами */
.leftCenter {background-position: left center;} /* задаем позицию ключевыми словами */
.leftBottom {background-position: left bottom;} /* задаем позицию ключевыми словами */
.rightTop {background-position: right top;} /* задаем позицию ключевыми словами */
.rightCenter {background-position: right center;} /* задаем позицию ключевыми словами */
.rightBottom {background-position: right bottom;} /* задаем позицию ключевыми словами */
.centerTop {background-position: center top;} /* задаем позицию ключевыми словами */
.centerCenter {background-position: center center;} /* задаем позицию ключевыми словами */
.centerBottom {background-position: center bottom;} /* задаем позицию ключевыми словами */
.userPosition {background-position: 20px 75%;} /* задаем позицию по горизонтали в пикселях, а по вертикали в процентах */
</style>
</head>
	<body>
		<div class = "leftTop">left top</div>
		<div class = "leftCenter">left center</div>
		<div class = "leftBottom">left bottom</div>
		<div class = "rightTop">right top</div>
		<div class = "rightCenter">right center</div>
		<div class = "rightBottom">right bottom</div>
		<div class = "centerTop">center top</div>
		<div class = "centerCenter">center center</div>
		<div class = "centerBottom">center bottom</div>
		<div class = "userPosition">20px 75%</div>
	</body>
</html>
В данном примере, мы создали 10 блоков с различными классами, в которых заданы различные значения, связанные с позиционированием фоновых изображений. Для первых девяти блоков были использованы всевозможные ключевые слова, а для последнего блока было задано значение для горизонтального позиционирования в пикселях, а для вертикального в процентах.
Результат нашего примера:
Рис. 117 Пример позиционирования фонового изображения.
Different Images for Different Devices
A large image can be perfect on a big computer
screen, but useless on a small device. Why load a large image when
you have to scale it down anyway? To reduce the load, or for any other reasons, you can use media queries to display different images on different devices.
Here is one large image and one smaller image that will be displayed on different devices:
Example
/* For width smaller than 400px: */body { background-image:
url(‘img_smallflower.jpg’); }/*
For width 400px and larger: */@media only screen and (min-width: 400px)
{ body { background-image: url(‘img_flowers.jpg’);
}}
You can use the media query , instead of , which
checks the device width, instead of the browser width. Then the image will not change when you resize the browser window:
Example
/* For devices smaller than 400px: */body { background-image:
url(‘img_smallflower.jpg’); }/*
For devices 400px and larger: */@media only screen and (min-device-width: 400px)
{ body {
background-image: url(‘img_flowers.jpg’); }}
Как автоматически писать “продолжение таблицы” на новой странице?
В ГОСТ 7.32 – 2017 в п 6.63 говорится ” При переносе части таблицы на другую страницу слово «Таблица», ее номер и наименование указывают один
раз слева над первой частью таблицы, а над другими частями также слева пишут слова «Продолжение
таблицы» и указывают номер таблицы”
Каждый раз мучится с переделыванием таблицы не хочется, как быть.
С 01.02.2020 года в силу вступает ГОСТ 2.105-2019, в нем запретили писать “продолжение таблицы”
Как сделать выпадающий список в Excel?
Выбираете ячейку, где будет выпадающий список.
Переходите на вкладку Данные – Проверка данных.
В появившемся окне на вкладке Параметры выбираете Список. Справа появиться окно Источник.
Щелканите по этому полю левой кнопкой мыши, а потом выбираете весь ранее созданный список и нажмите ОК.
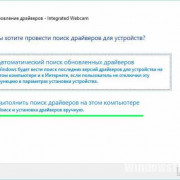
Как в экселе автоматически пронумеровать строки?
Добрый день. В программе эксель существует три способа пронумеровать строк. Подробно все способы, с фото каждого шага, можно посмотреть тут: https://portalonline.ru/kompyutery-i-programmy/1815-kak-v-eksele-protyanut-cifry-po-poryadku.html
Самый простой и быстрый способ, это поставить в первой строке “1”, а во второй “2”, потом выделяем обе цифры и в правом нижнем углу, выделенной области, жмете дважды на маленький квадрат и строки быстро все пронумируются.
Второй способ, это прописать формулу и протянуть на все ячейки. В ячейке первой ставите «1», а во второй пишете формулу =1+А1. А дальше её копируете.
Как убрать переносы в ворде?
Что бы убрать автоматические переносы в Word 2007, 2010 надо перейти во вкладку “Разметка страницы”, а там в разделе “Параметры страницы” выбрать “Расстановка переносов”. Далее в выпадающем меню выбрать “Нет”.
Как распечатать лист эксель на одном листе?
Практически каждый пользователь сталкивался с такой ситуацией, когда большая таблица не хочет влезать на один лист, иногда это вообще какие-то пару сантиметров. Но решить подобную задачу в программе эксель можно быстро и самое главное очень легко.
Ваша задача попасть в меню предосмотр, это там, где вы наблюдаете, как будет выглядеть ваш лист. Для этого просто нажмите горячую клавишу CTRL+P и вы попадете в режим предосмотра.
Там находите меню “Параметры страницы”, где устанавливаете ограничение по высоте и ширине по 1 листу.
Тут хорошо показано, как это сделать, с помощью подробной фото и видеоинструкции.
Источник статьи: http://yandex.ru/q/question/computers/kak_avtomaticheski_pisat_prodolzhenie_na_8aaf2d8a/
More
Fullscreen VideoModal BoxesDelete ModalTimelineScroll IndicatorProgress BarsSkill BarRange SlidersTooltipsDisplay Element HoverPopupsCollapsibleCalendarHTML IncludesTo Do ListLoadersStar RatingUser RatingOverlay EffectContact ChipsCardsFlip CardProfile CardProduct CardAlertsCalloutNotesLabelsCirclesStyle HRCouponList GroupList Without BulletsResponsive TextCutout TextGlowing TextFixed FooterSticky ElementEqual HeightClearfixResponsive FloatsSnackbarFullscreen WindowScroll DrawingSmooth ScrollGradient Bg ScrollSticky HeaderShrink Header on ScrollPricing TableParallaxAspect RatioResponsive IframesToggle Like/DislikeToggle Hide/ShowToggle Dark ModeToggle TextToggle ClassAdd ClassRemove ClassActive ClassTree ViewRemove PropertyOffline DetectionFind Hidden ElementRedirect WebpageZoom HoverFlip BoxCenter VerticallyCenter Button in DIVTransition on HoverArrowsShapesDownload LinkFull Height ElementBrowser WindowCustom ScrollbarHide ScrollbarShow/Force ScrollbarDevice LookContenteditable BorderPlaceholder ColorText Selection ColorBullet ColorVertical LineDividersAnimate IconsCountdown TimerTypewriterComing Soon PageChat MessagesPopup Chat WindowSplit ScreenTestimonialsSection CounterQuotes SlideshowClosable List ItemsTypical Device BreakpointsDraggable HTML ElementJS Media QueriesSyntax HighlighterJS AnimationsJS String LengthJS Default ParametersGet Current URLGet Current Screen SizeGet Iframe Elements
CSS Advanced
CSS Rounded CornersCSS Border ImagesCSS BackgroundsCSS ColorsCSS Gradients
Linear Gradients
Radial Gradients
CSS Shadows
Shadow Effects
Box Shadow
CSS Text EffectsCSS Web FontsCSS 2D TransformsCSS 3D TransformsCSS TransitionsCSS AnimationsCSS TooltipsCSS Style ImagesCSS object-fitCSS ButtonsCSS PaginationCSS Multiple ColumnsCSS User InterfaceCSS Variables
The var() Function
Overriding Variables
Variables and JavaScript
Variables in Media Queries
CSS Box SizingCSS Media QueriesCSS MQ ExamplesCSS Flexbox
CSS Flexbox
CSS Flex Container
CSS Flex Items
CSS Flex Responsive
Тень от изображения.
Чтобы создать эффект тени, используется свойство box-shadow.
Первое значение — это сдвиг тени по оси X.
Второе значение – это сдвиг тени по оси Y.
Третье значение – размытие тени. Если этот параметр не указывается, то по умолчанию тень не будет размытой.
Четвёртое значение – растяжение тени. По умолчанию тень того же размера, что и элемент.
Пятое значение – цвет тени. Цвет тени можно задать как в RGB-формате так и в RGBA-формате. По умолчанию цвет чёрный.
img {width: 300px;height: 150px;border: 1px solid #000;border-radius: 10px;box-shadow:5px 5px 10px #2B1015;
}
Обтекание изображения текстом.
Для наглядности в index.html добавьте текст.
<!DOCTYPE html><html> <head> <meta charset=»utf-8″> <link rel= «stylesheet» type= «text/css» href= «style.css» /> <title>Изображения</title> </head> <body> <img src=»images/img1.jpg»> <p>Это текст, который обтекает изображение справа.</p> <p>Для наглядности напишем несколько абзацев</p> <p>Абзац первый</p> <p>Абзац второй</p> <p>Абзац третий</p> <p>А этот абзац обтекает изображение уже снизу.</p> </body> </html>
Если мы хотим, чтобы изображение располагалось слева, а текст обтекал его справа, используем свойство float , значением которого будет left.
А для того, чтобы текст не прилипал к изображению, используем свойство margin-right.
img {width: 300px;height: 150px;border: 1px solid #000;border-radius: 10px;box-shadow:5px 5px 10px #2B1015;float: left;margin-right: 20px;
}
More
Fullscreen VideoModal BoxesDelete ModalTimelineScroll IndicatorProgress BarsSkill BarRange SlidersTooltipsDisplay Element HoverPopupsCollapsibleCalendarHTML IncludesTo Do ListLoadersStar RatingUser RatingOverlay EffectContact ChipsCardsFlip CardProfile CardProduct CardAlertsCalloutNotesLabelsCirclesStyle HRCouponList GroupList Without BulletsResponsive TextCutout TextGlowing TextFixed FooterSticky ElementEqual HeightClearfixResponsive FloatsSnackbarFullscreen WindowScroll DrawingSmooth ScrollGradient Bg ScrollSticky HeaderShrink Header on ScrollPricing TableParallaxAspect RatioResponsive IframesToggle Like/DislikeToggle Hide/ShowToggle Dark ModeToggle TextToggle ClassAdd ClassRemove ClassActive ClassTree ViewRemove PropertyOffline DetectionFind Hidden ElementRedirect WebpageZoom HoverFlip BoxCenter VerticallyCenter Button in DIVTransition on HoverArrowsShapesDownload LinkFull Height ElementBrowser WindowCustom ScrollbarHide ScrollbarShow/Force ScrollbarDevice LookContenteditable BorderPlaceholder ColorText Selection ColorBullet ColorVertical LineDividersAnimate IconsCountdown TimerTypewriterComing Soon PageChat MessagesPopup Chat WindowSplit ScreenTestimonialsSection CounterQuotes SlideshowClosable List ItemsTypical Device BreakpointsDraggable HTML ElementJS Media QueriesSyntax HighlighterJS AnimationsJS String LengthJS Default ParametersGet Current URLGet Current Screen SizeGet Iframe Elements
Оставить ответ
More Examples
Example
Sets two background images for the <body> element. Let the first
image appear only once (with no-repeat), and let the second image be repeated:
body { background-image: url(«img_tree.gif»), url(«paper.gif»);
background-repeat: no-repeat, repeat; background-color: #cccccc;}
Example
Use different background properties to create a «hero» image:
.hero-image { background-image: url(«photographer.jpg»); /* The
image used */ background-color: #cccccc; /* Used if the image is
unavailable */ height: 500px; /* You must set a specified height */
background-position: center; /* Center the image */
background-repeat: no-repeat; /* Do not repeat the image */
background-size: cover; /* Resize the background image to cover the entire container */}
Example
Sets a linear-gradient (two colors) as a background image for a <div> element:
#grad1 { height: 200px; background-color: #cccccc; background-image:
linear-gradient(red, yellow);}
Example
Sets a linear-gradient (three colors) as a background image for a <div> element:
#grad1 { height: 200px; background-color: #cccccc; background-image:
linear-gradient(red, yellow, green);}
Example
The repeating-linear-gradient() function is used to repeat linear gradients:
#grad1 { height: 200px; background-color: #cccccc; background-image:
repeating-linear-gradient(red, yellow 10%, green 20%);}
Example
Sets a radial-gradient (two colors) as a background image for a <div> element:
#grad1 { height: 200px; background-color: #cccccc; background-image:
radial-gradient(red, yellow);}
Example
Sets a radial-gradient (three colors) as a background image for a <div> element:
#grad1 { height: 200px; background-color: #cccccc; background-image:
radial-gradient(red, yellow, green);}
Example
The repeating-radial-gradient() function is used to repeat radial gradients:
#grad1 { height: 200px; background-color: #cccccc; background-image:
repeating-radial-gradient(red, yellow 10%, green 20%);}
More
Fullscreen VideoModal BoxesDelete ModalTimelineScroll IndicatorProgress BarsSkill BarRange SlidersTooltipsDisplay Element HoverPopupsCollapsibleCalendarHTML IncludesTo Do ListLoadersStar RatingUser RatingOverlay EffectContact ChipsCardsFlip CardProfile CardProduct CardAlertsCalloutNotesLabelsCirclesStyle HRCouponList GroupList Without BulletsResponsive TextCutout TextGlowing TextFixed FooterSticky ElementEqual HeightClearfixResponsive FloatsSnackbarFullscreen WindowScroll DrawingSmooth ScrollGradient Bg ScrollSticky HeaderShrink Header on ScrollPricing TableParallaxAspect RatioResponsive IframesToggle Like/DislikeToggle Hide/ShowToggle Dark ModeToggle TextToggle ClassAdd ClassRemove ClassActive ClassTree ViewRemove PropertyOffline DetectionFind Hidden ElementRedirect WebpageZoom HoverFlip BoxCenter VerticallyCenter Button in DIVTransition on HoverArrowsShapesDownload LinkFull Height ElementBrowser WindowCustom ScrollbarHide ScrollbarShow/Force ScrollbarDevice LookContenteditable BorderPlaceholder ColorText Selection ColorBullet ColorVertical LineDividersAnimate IconsCountdown TimerTypewriterComing Soon PageChat MessagesPopup Chat WindowSplit ScreenTestimonialsSection CounterQuotes SlideshowClosable List ItemsTypical Device BreakpointsDraggable HTML ElementJS Media QueriesSyntax HighlighterJS AnimationsJS String LengthJS Default ParametersGet Current URLGet Current Screen SizeGet Iframe Elements
Images
SlideshowSlideshow GalleryModal ImagesLightboxResponsive Image GridImage GridTab GalleryImage Overlay FadeImage Overlay SlideImage Overlay ZoomImage Overlay TitleImage Overlay IconImage EffectsBlack and White ImageImage TextImage Text BlocksTransparent Image TextFull Page ImageForm on ImageHero ImageBlur Background ImageChange Bg on ScrollSide-by-Side ImagesRounded ImagesAvatar ImagesResponsive ImagesCenter ImagesThumbnailsBorder Around ImageMeet the TeamSticky ImageFlip an ImageShake an ImagePortfolio GalleryPortfolio with FilteringImage ZoomImage Magnifier GlassImage Comparison Slider
CSS Properties
align-contentalign-itemsalign-selfallanimationanimation-delayanimation-directionanimation-durationanimation-fill-modeanimation-iteration-countanimation-nameanimation-play-stateanimation-timing-functionbackface-visibilitybackgroundbackground-attachmentbackground-blend-modebackground-clipbackground-colorbackground-imagebackground-originbackground-positionbackground-repeatbackground-sizeborderborder-bottomborder-bottom-colorborder-bottom-left-radiusborder-bottom-right-radiusborder-bottom-styleborder-bottom-widthborder-collapseborder-colorborder-imageborder-image-outsetborder-image-repeatborder-image-sliceborder-image-sourceborder-image-widthborder-leftborder-left-colorborder-left-styleborder-left-widthborder-radiusborder-rightborder-right-colorborder-right-styleborder-right-widthborder-spacingborder-styleborder-topborder-top-colorborder-top-left-radiusborder-top-right-radiusborder-top-styleborder-top-widthborder-widthbottombox-decoration-breakbox-shadowbox-sizingbreak-afterbreak-beforebreak-insidecaption-sidecaret-color@charsetclearclipclip-pathcolorcolumn-countcolumn-fillcolumn-gapcolumn-rulecolumn-rule-colorcolumn-rule-stylecolumn-rule-widthcolumn-spancolumn-widthcolumnscontentcounter-incrementcounter-resetcursordirectiondisplayempty-cellsfilterflexflex-basisflex-directionflex-flowflex-growflex-shrinkflex-wrapfloatfont@font-facefont-familyfont-feature-settingsfont-kerningfont-sizefont-size-adjustfont-stretchfont-stylefont-variantfont-variant-capsfont-weightgridgrid-areagrid-auto-columnsgrid-auto-flowgrid-auto-rowsgrid-columngrid-column-endgrid-column-gapgrid-column-startgrid-gapgrid-rowgrid-row-endgrid-row-gapgrid-row-startgrid-templategrid-template-areasgrid-template-columnsgrid-template-rowshanging-punctuationheighthyphens@importisolationjustify-content@keyframesleftletter-spacingline-heightlist-stylelist-style-imagelist-style-positionlist-style-typemarginmargin-bottommargin-leftmargin-rightmargin-topmax-heightmax-width@mediamin-heightmin-widthmix-blend-modeobject-fitobject-positionopacityorderoutlineoutline-coloroutline-offsetoutline-styleoutline-widthoverflowoverflow-xoverflow-ypaddingpadding-bottompadding-leftpadding-rightpadding-toppage-break-afterpage-break-beforepage-break-insideperspectiveperspective-originpointer-eventspositionquotesresizerightscroll-behaviortab-sizetable-layouttext-aligntext-align-lasttext-decorationtext-decoration-colortext-decoration-linetext-decoration-styletext-indenttext-justifytext-overflowtext-shadowtext-transformtoptransformtransform-origintransform-styletransitiontransition-delaytransition-durationtransition-propertytransition-timing-functionunicode-bidiuser-selectvertical-alignvisibilitywhite-spacewidthword-breakword-spacingword-wrapwriting-modez-index
Images
SlideshowSlideshow GalleryModal ImagesLightboxResponsive Image GridImage GridTab GalleryImage Overlay FadeImage Overlay SlideImage Overlay ZoomImage Overlay TitleImage Overlay IconImage EffectsBlack and White ImageImage TextImage Text BlocksTransparent Image TextFull Page ImageForm on ImageHero ImageBlur Background ImageChange Bg on ScrollSide-by-Side ImagesRounded ImagesAvatar ImagesResponsive ImagesCenter ImagesThumbnailsBorder Around ImageMeet the TeamSticky ImageFlip an ImageShake an ImagePortfolio GalleryPortfolio with FilteringImage ZoomImage Magnifier GlassImage Comparison Slider
More
Fullscreen VideoModal BoxesDelete ModalTimelineScroll IndicatorProgress BarsSkill BarRange SlidersTooltipsDisplay Element HoverPopupsCollapsibleCalendarHTML IncludesTo Do ListLoadersStar RatingUser RatingOverlay EffectContact ChipsCardsFlip CardProfile CardProduct CardAlertsCalloutNotesLabelsCirclesStyle HRCouponList GroupList Without BulletsResponsive TextCutout TextGlowing TextFixed FooterSticky ElementEqual HeightClearfixResponsive FloatsSnackbarFullscreen WindowScroll DrawingSmooth ScrollGradient Bg ScrollSticky HeaderShrink Header on ScrollPricing TableParallaxAspect RatioResponsive IframesToggle Like/DislikeToggle Hide/ShowToggle Dark ModeToggle TextToggle ClassAdd ClassRemove ClassActive ClassTree ViewRemove PropertyOffline DetectionFind Hidden ElementRedirect WebpageZoom HoverFlip BoxCenter VerticallyCenter Button in DIVTransition on HoverArrowsShapesDownload LinkFull Height ElementBrowser WindowCustom ScrollbarHide ScrollbarShow/Force ScrollbarDevice LookContenteditable BorderPlaceholder ColorText Selection ColorBullet ColorVertical LineDividersAnimate IconsCountdown TimerTypewriterComing Soon PageChat MessagesPopup Chat WindowSplit ScreenTestimonialsSection CounterQuotes SlideshowClosable List ItemsTypical Device BreakpointsDraggable HTML ElementJS Media QueriesSyntax HighlighterJS AnimationsJS String LengthJS Default ParametersGet Current URLGet Current Screen SizeGet Iframe Elements
CSS Filters
The CSS property adds visual effects (like blur and saturation) to an element.
Note: The filter property is not supported in Internet Explorer, Edge 12, or Safari 5.1 and earlier.
Grayscale Example
Change the color of all images to black and white (100% gray):
img { -webkit-filter: grayscale(100%); /* Safari 6.0 — 9.0 */
filter: grayscale(100%);}
Original image
grayscale(100%)
Blur Example
Apply a blur effect to all images:
img { -webkit-filter: blur(5px); /* Safari 6.0 — 9.0 */ filter: blur(5px);}
Original image
blur(5px)
Go to our CSS filter Property to learn more about
CSS filters.
❮ Previous
Next ❯
Комментарии
Images
SlideshowSlideshow GalleryModal ImagesLightboxResponsive Image GridImage GridTab GalleryImage Overlay FadeImage Overlay SlideImage Overlay ZoomImage Overlay TitleImage Overlay IconImage EffectsBlack and White ImageImage TextImage Text BlocksTransparent Image TextFull Page ImageForm on ImageHero ImageBlur Background ImageChange Bg on ScrollSide-by-Side ImagesRounded ImagesAvatar ImagesResponsive ImagesCenter ImagesThumbnailsBorder Around ImageMeet the TeamSticky ImageFlip an ImageShake an ImagePortfolio GalleryPortfolio with FilteringImage ZoomImage Magnifier GlassImage Comparison Slider
Image Modal (Advanced)
This is an example to demonstrate how CSS and JavaScript can work together.
First, use CSS to create a modal window (dialog box), and hide it by
default.
Then, use a JavaScript to show the modal window and to display the
image inside the modal, when a user clicks on the image:
Example
// Get the modalvar modal = document.getElementById(‘myModal’);// Get the image and insert it
inside the modal — use its «alt» text as a captionvar img =
document.getElementById(‘myImg’);var modalImg = document.getElementById(«img01»);
var captionText = document.getElementById(«caption»);img.onclick =
function(){ modal.style.display = «block»; modalImg.src = this.src; captionText.innerHTML = this.alt;}
// Get the <span> element that closes the modalvar span =
document.getElementsByClassName(«close»);// When the user clicks
on <span> (x), close the modalspan.onclick = function() { modal.style.display = «none»;}
❮ Previous
Next ❯
Transparency using RGBA
If you do not want to apply opacity to child elements, like in our example above, use RGBA color values.
The following example sets the opacity for the background color and not the text:
100% opacity
60% opacity
30% opacity
10% opacity
You learned from our CSS Colors Chapter, that you can use RGB as a color value. In addition to RGB,
you can use an RGB color value with an alpha channel (RGBA) — which specifies the opacity for a color.
An RGBA color value is specified with: rgba(red, green, blue, alpha). The
alpha parameter is a number between 0.0 (fully transparent) and 1.0 (fully opaque).
Tip: You will learn more about RGBA Colors in our CSS Colors Chapter.
CSS Tutorial
CSS HOMECSS IntroductionCSS SyntaxCSS SelectorsCSS How ToCSS CommentsCSS Colors
Colors
RGB
HEX
HSL
CSS Backgrounds
Background Color
Background Image
Background Repeat
Background Attachment
Background Shorthand
CSS Borders
Borders
Border Width
Border Color
Border Sides
Border Shorthand
Rounded Borders
CSS Margins
Margins
Margin Collapse
CSS PaddingCSS Height/WidthCSS Box ModelCSS Outline
Outline
Outline Width
Outline Color
Outline Shorthand
Outline Offset
CSS Text
Text Color
Text Alignment
Text Decoration
Text Transformation
Text Spacing
Text Shadow
CSS Fonts
Font Family
Font Web Safe
Font Style
Font Size
Font Google
Font Shorthand
CSS IconsCSS LinksCSS ListsCSS Tables
Table Borders
Table Size
Table Alignment
Table Style
Table Responsive
CSS DisplayCSS Max-widthCSS PositionCSS OverflowCSS Float
Float
Clear
Float Examples
CSS Inline-blockCSS AlignCSS CombinatorsCSS Pseudo-classCSS Pseudo-elementCSS OpacityCSS Navigation Bar
Navbar
Vertical Navbar
Horizontal Navbar
CSS DropdownsCSS Image GalleryCSS Image SpritesCSS Attr SelectorsCSS FormsCSS CountersCSS Website LayoutCSS UnitsCSS Specificity